
Crossworlds: The Flying City
Crossworlds: The Flying City Walkthrough is a detailed guide that contains everything you need to know to beat the game, including more than 100 customized screenshots. Can you help Monika find her father before it's too late?
Cross Worlds tells the saga of a woman, Monika, who is dedicated to finding her inventor father who has gone missing. Monika travels into and out of four different worlds in her quest investing a lot of time hunting down clues, finding hidden objects, playing mini-games and more.
GETTING STARTED
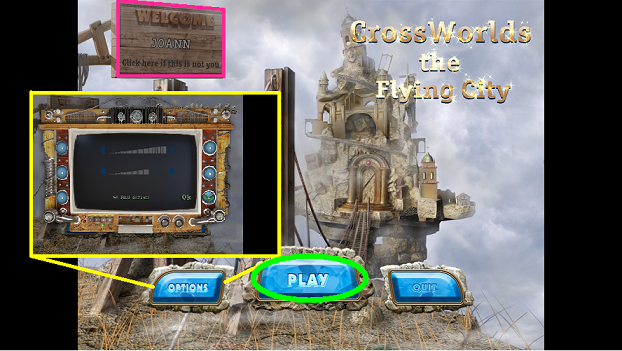
• Click on the Welcome sign (pink) to enter your name
• Click on the Options button to change the sound and screen size to your personal preferences (yellow)
• Click on the Play button (green) to get started
After you page through the dialogue, you will find yourself in a bedroom where you can take note of important locations and images.
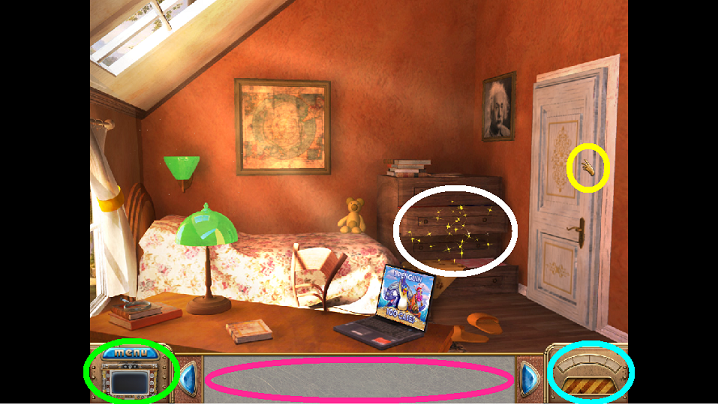
• The bottom left (green) indicates both the Menu button and the Diary which will help you track clues. When the journal screen emits tiny sparkles and an exclamation point, you must look at it before the game will let you continue.
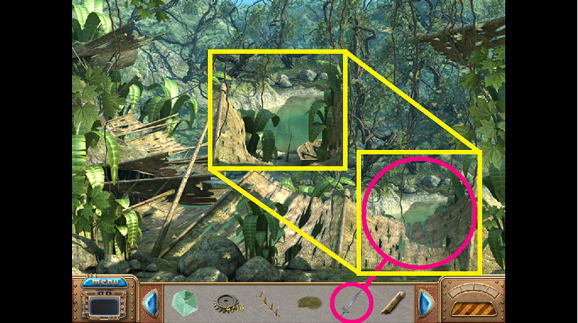
• The bottom right (aqua) will give you Hints to help you find objects. Hints are unlimited but you must wait until all bars show that it is fully charged to give you another hint.
• The bottom center (fuchsia) is your Inventory and will store items you need to complete your tasks. It will also hold your Hidden Items list when appropriate.
• The sparkles (white) indicate an area of interest; always click on the sparkles.
• The hand (yellow) is one of the four cursors that appear during the game. The hand indicates something you can grab or take. When it is an eye, you can look more closely at the area. When the cursor becomes a pair of gears, you need to apply an object to the area. Lastly, when the cursor becomes an arrow, it means you can go in that direction.
• When your cursor hovers just over the Inventory, an arrow pointing down will appear, indicating that you can go backwards to where you were before.
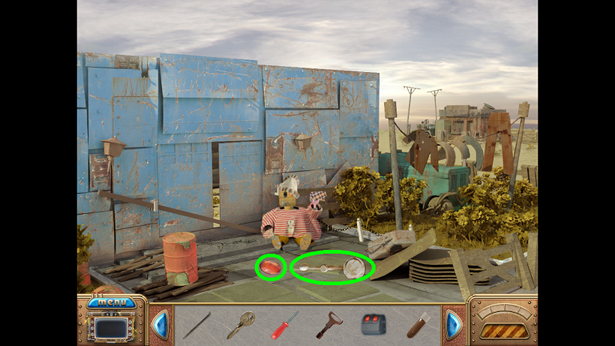
WORLD 1 – THE SCIENTIST’S HOUSE
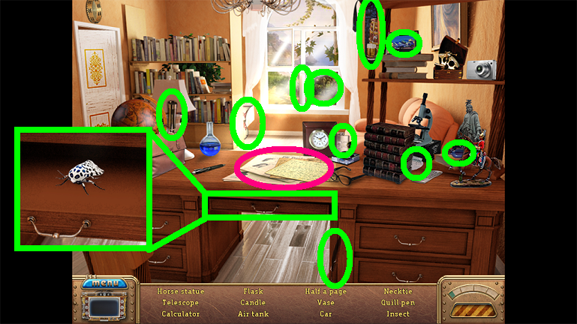
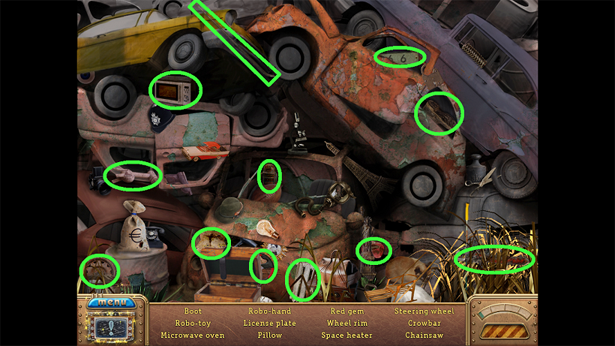
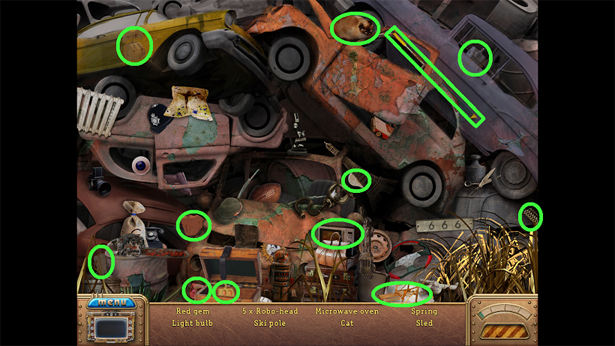
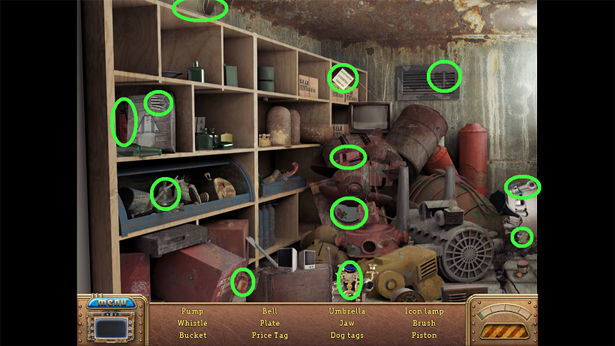
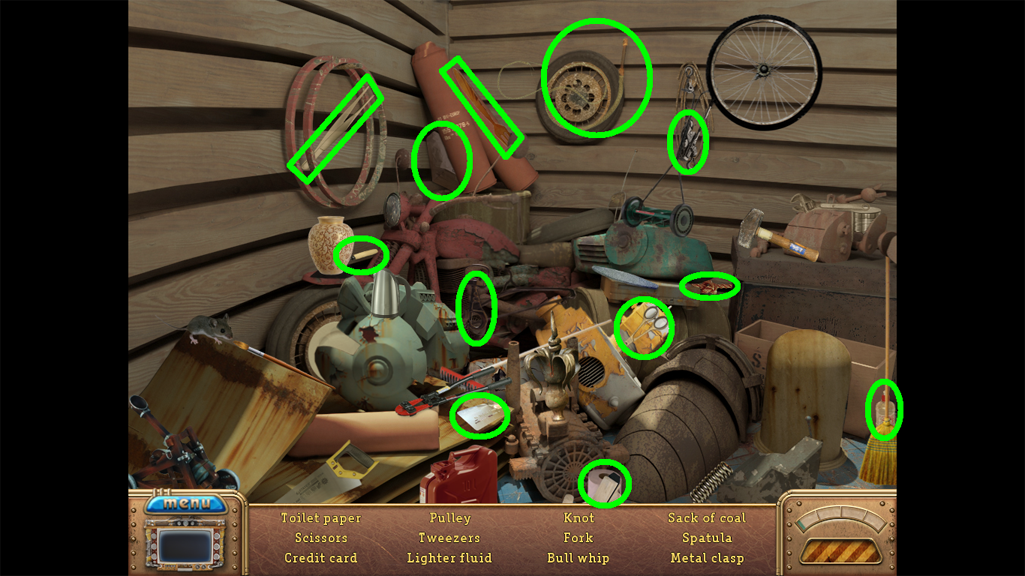
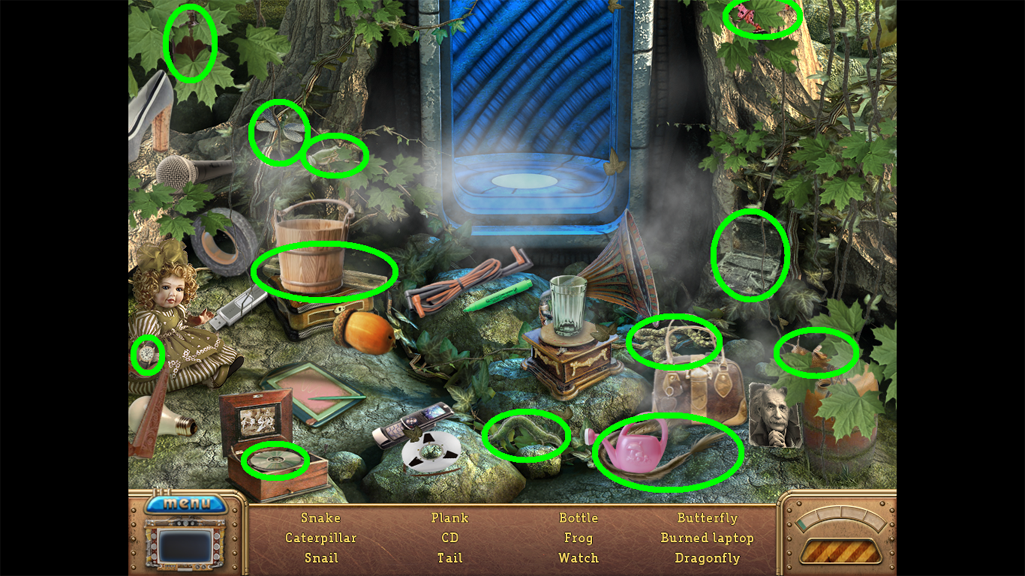
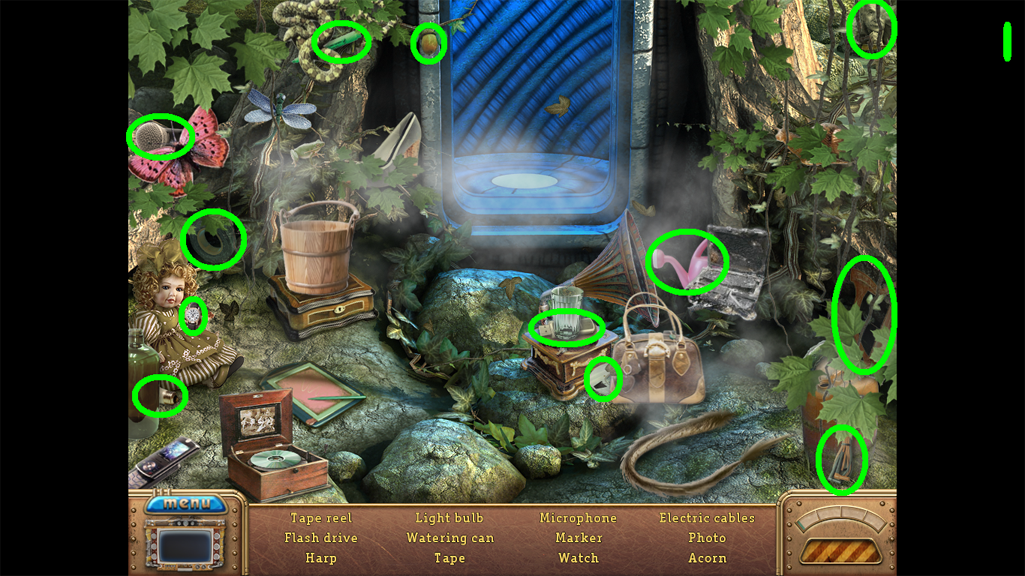
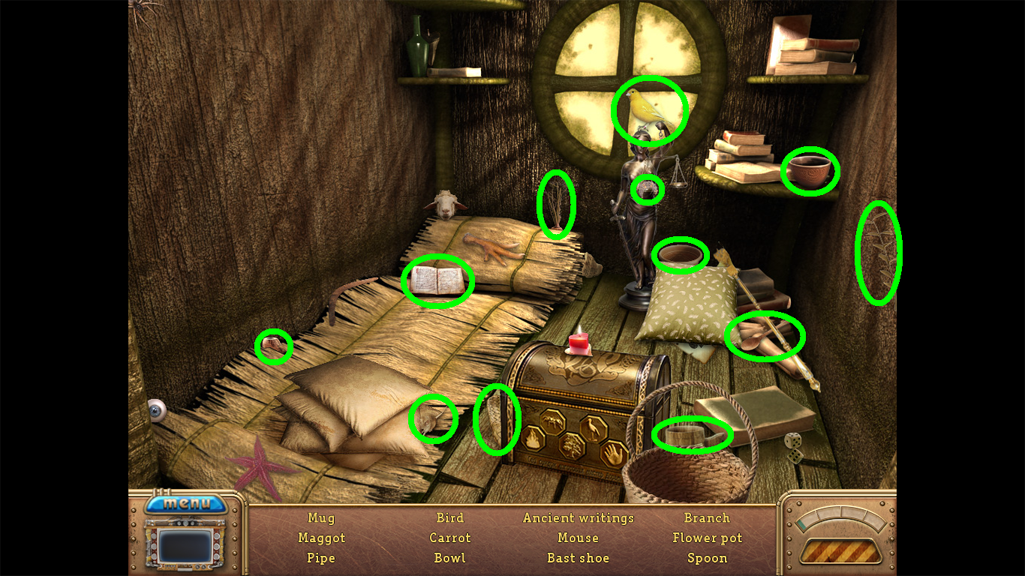
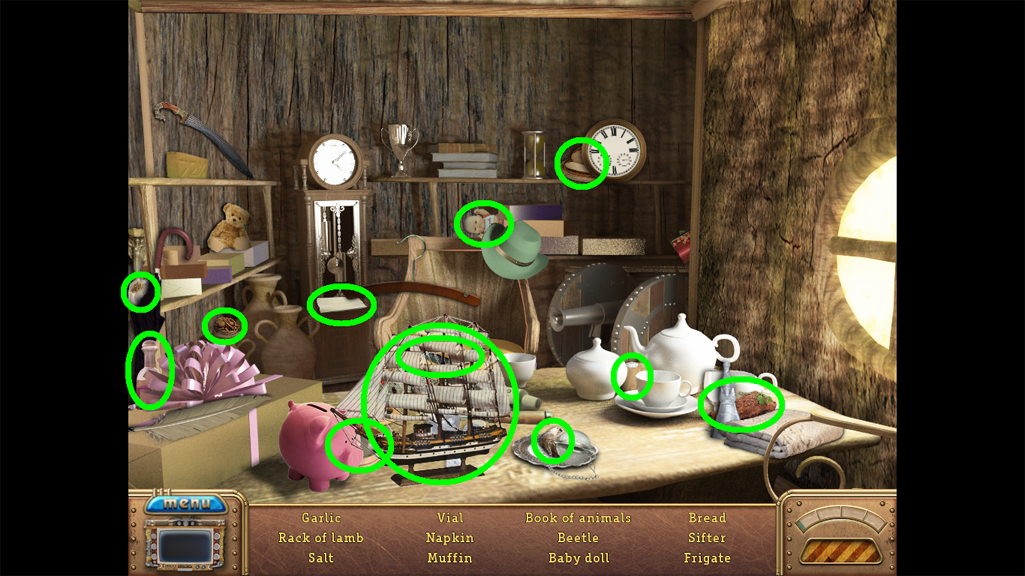
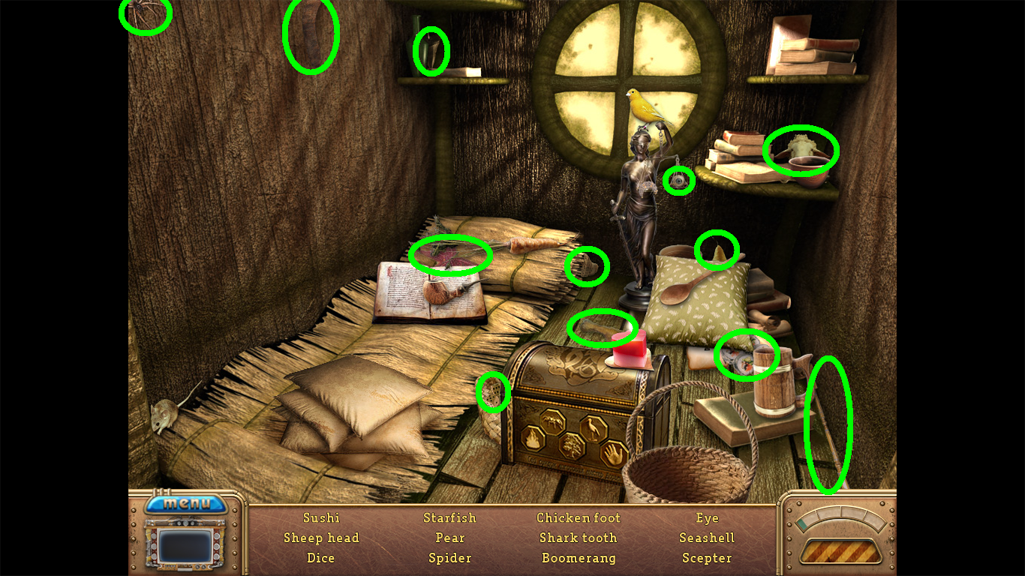
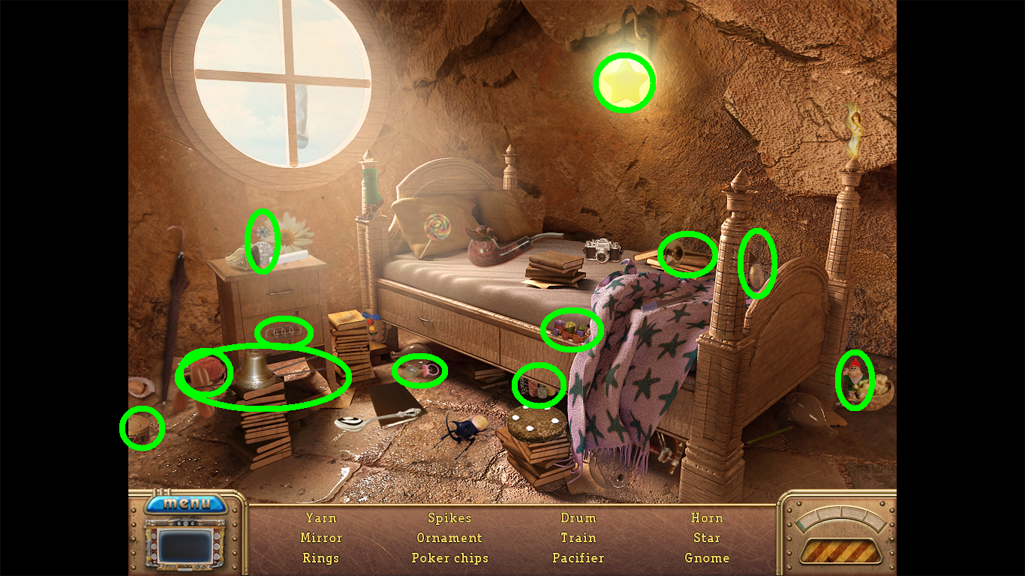
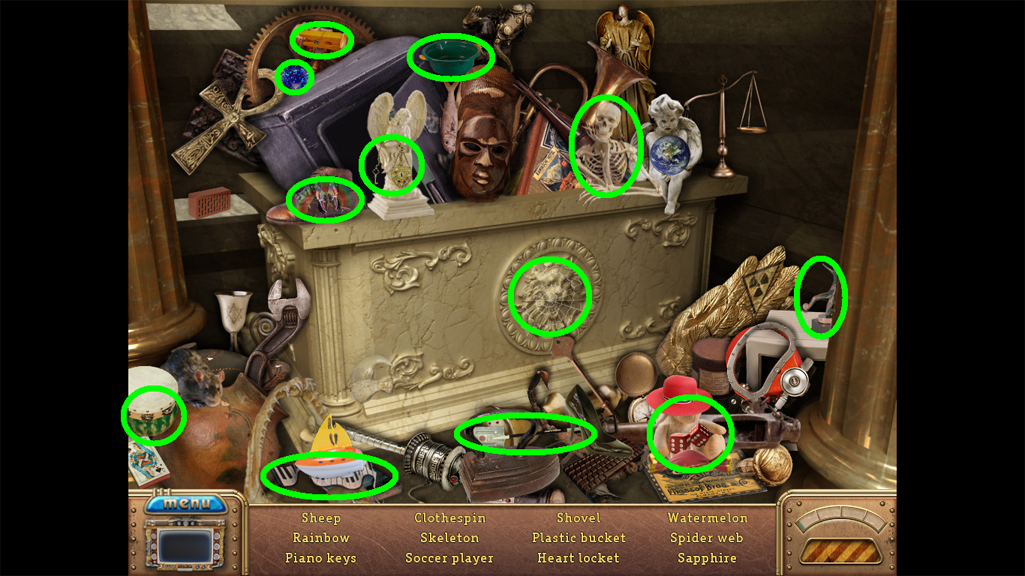
1. Start in the bedroom pictured above. Click on the yellow sparkles.
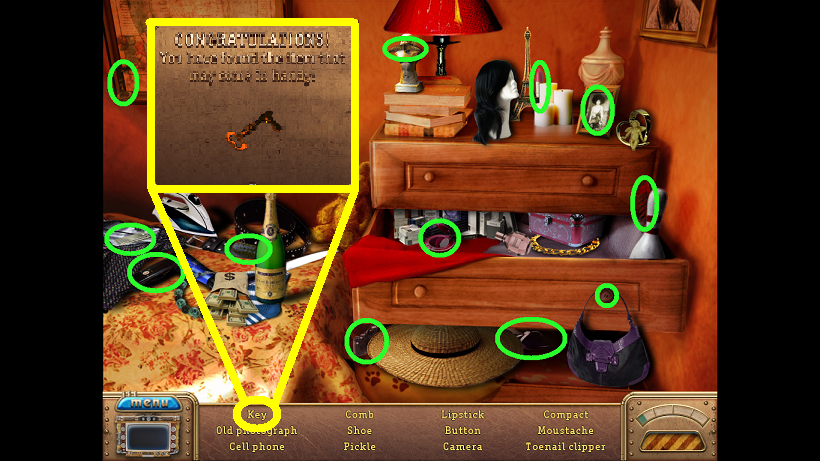
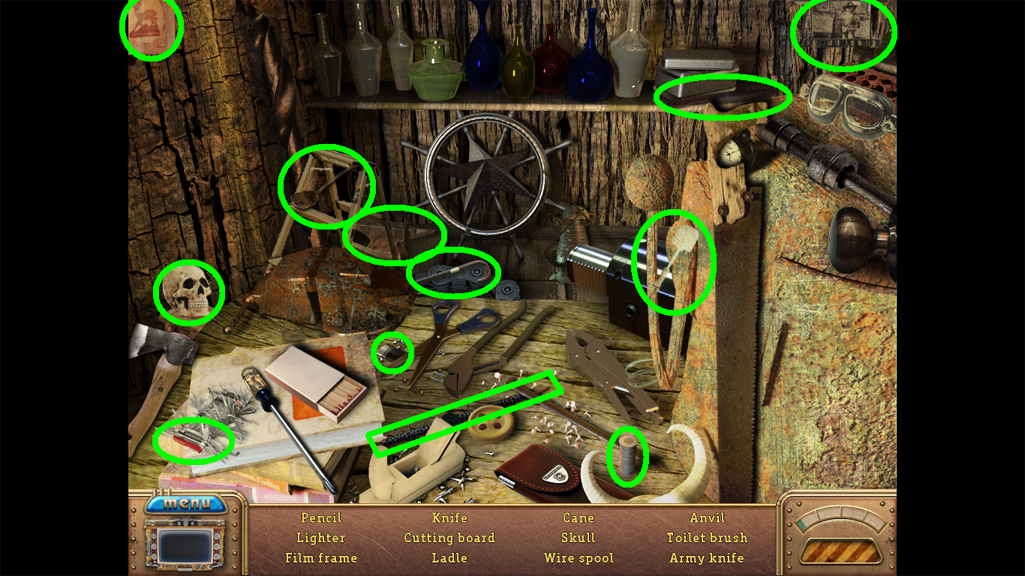
2. Find the hidden objects listed in the inventory (as circled in green). The game will automatically add the Key to your Inventory after you have located all items (yellow).
3. Look at the close-up of the door lock. When you see the gears, use the Key to unlock the door.
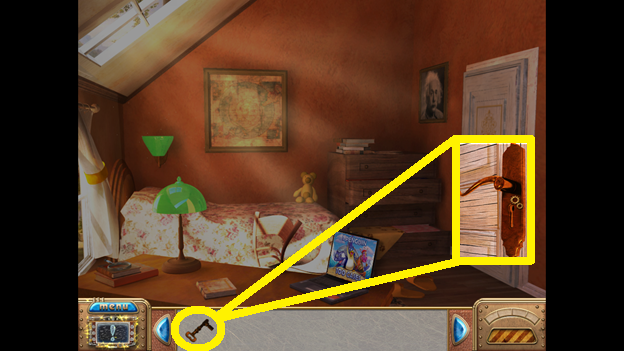
4. Open the door and leave the room.
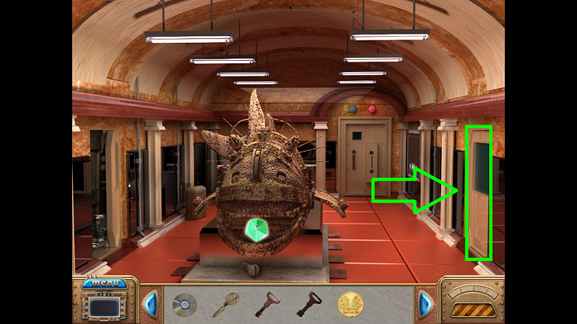
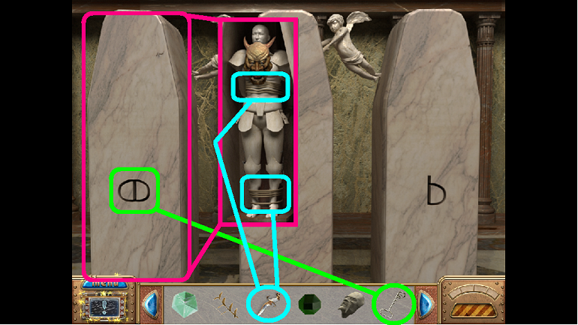
5. You are now in the foyer of the Scientist’s House. You may go three different ways: to the right (green arrow) is the Living Room, to the left is the Bedroom (fuchsia), and down and to the left will take you to the Basement (aqua).
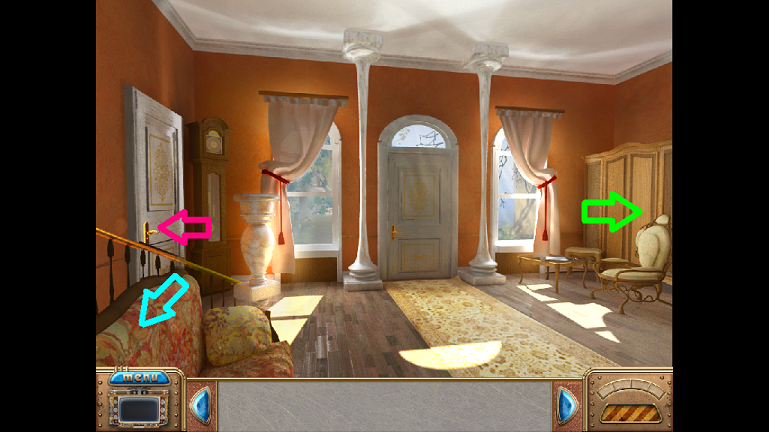
6. Go to the right to the Living Room. Notice the crooked picture (green box). When you see the eye hover over it, click to reveal a clue (green circle). Then click on the Journal to receive a task (Fuchsia).
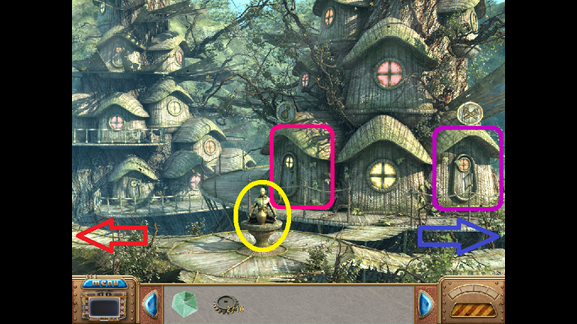
7. Exit the room through the door. You are now in your father’s Study.
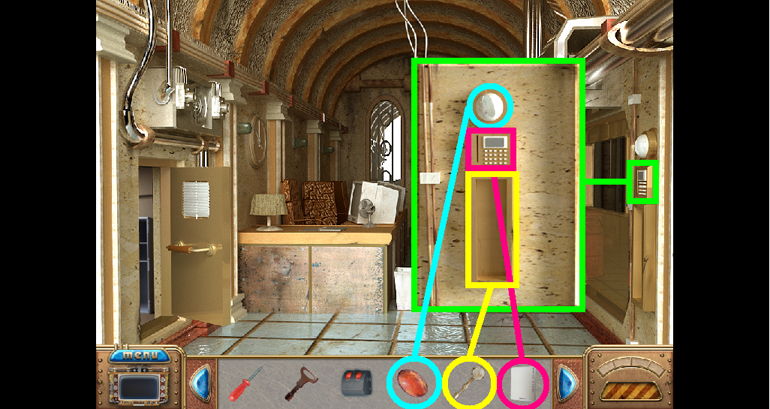
8. Open the top drawer on the right and pick up the Map (green). Then check your journal (yellow). Also note that you have a new door you can go through on the left (fuchsia).
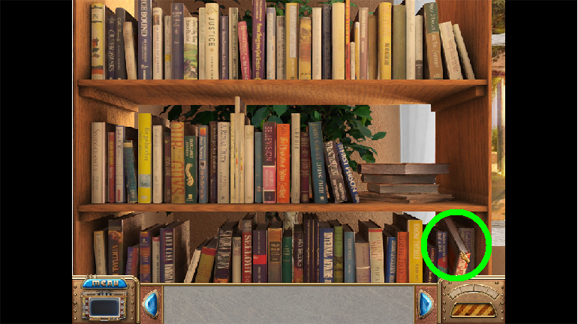
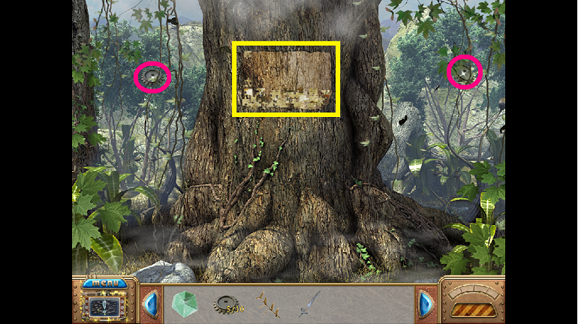
9. Next, click on the bookcases for a closer look.
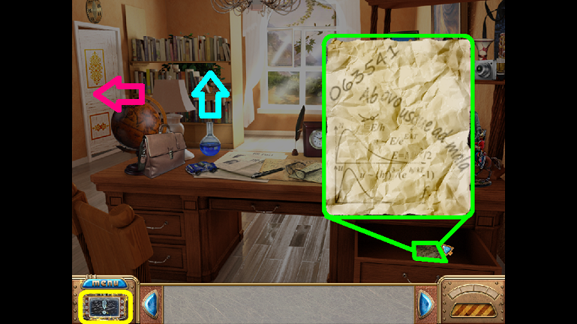
10. Now you will need to find the special diagrams that are hidden among the books. The diagram is tucked into the book Beyond Prozac on the bottom right side (green, below). Grab the book, then open it. You now must find the missing page; click on your journal first, then go back down towards the larger Study.
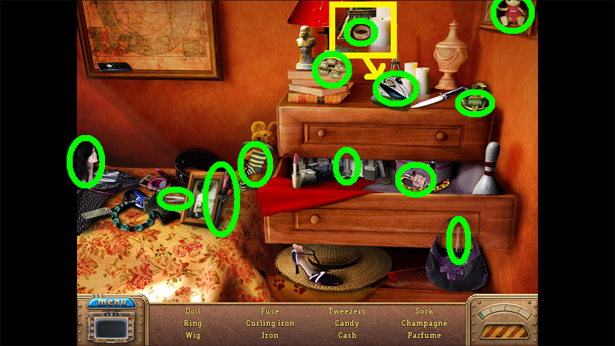
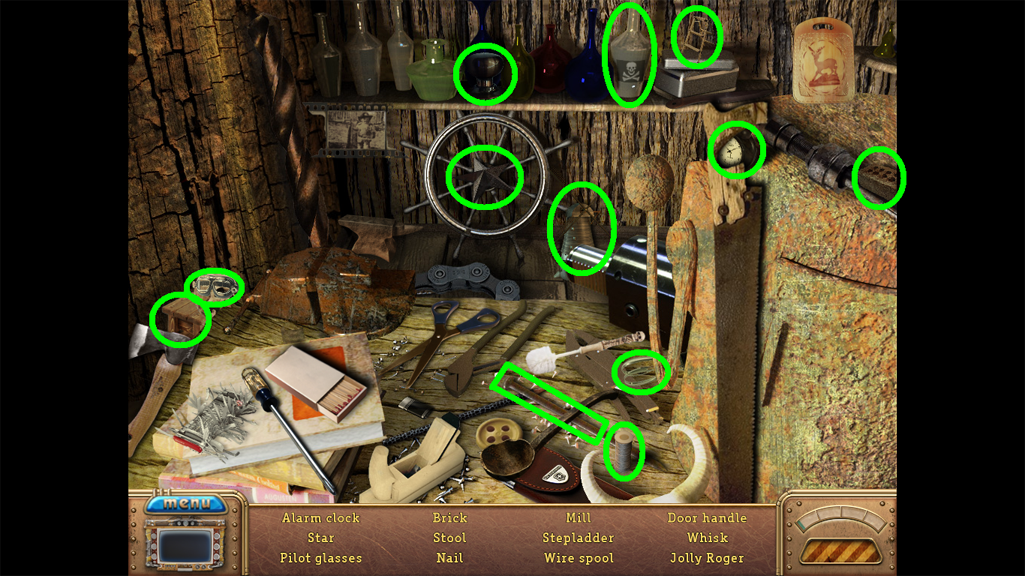
11. Find the hidden objects as shown (green). For the bug you must click on the center drawer to open it. For the piece of paper, you must click several times on the pile of papers (fuschia) and then take the paper.
12. Go back to the Library area in the Study. Reopen the Beyond Prozac book.
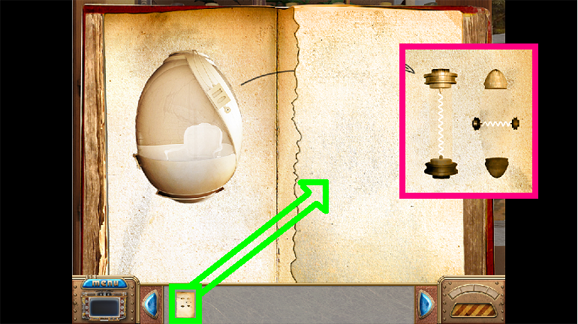
13. Drag the Page from your Inventory to the blank right side of the book (green). The piece will then show you the items you must find (fuchsia). Then click on the book to close it.
14. Go to the Basement (walk down once to leave the bookcase, walk through the door on the left, walk down to exit to the Foyer, then walk through the door on the left).
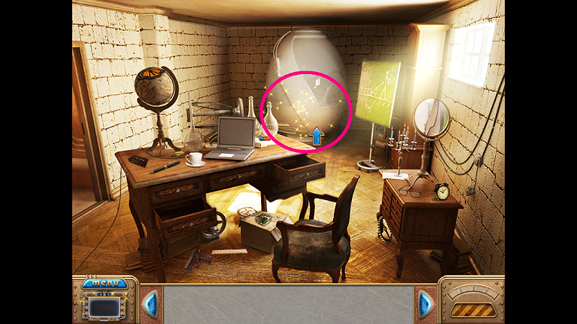
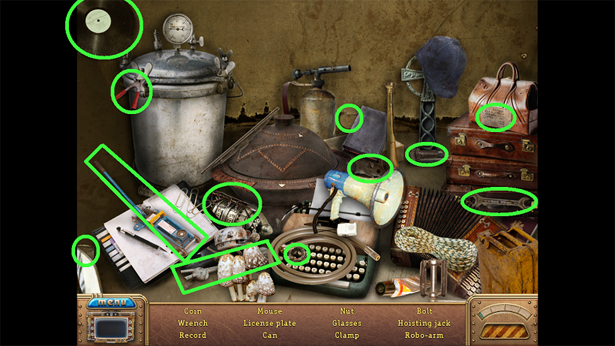
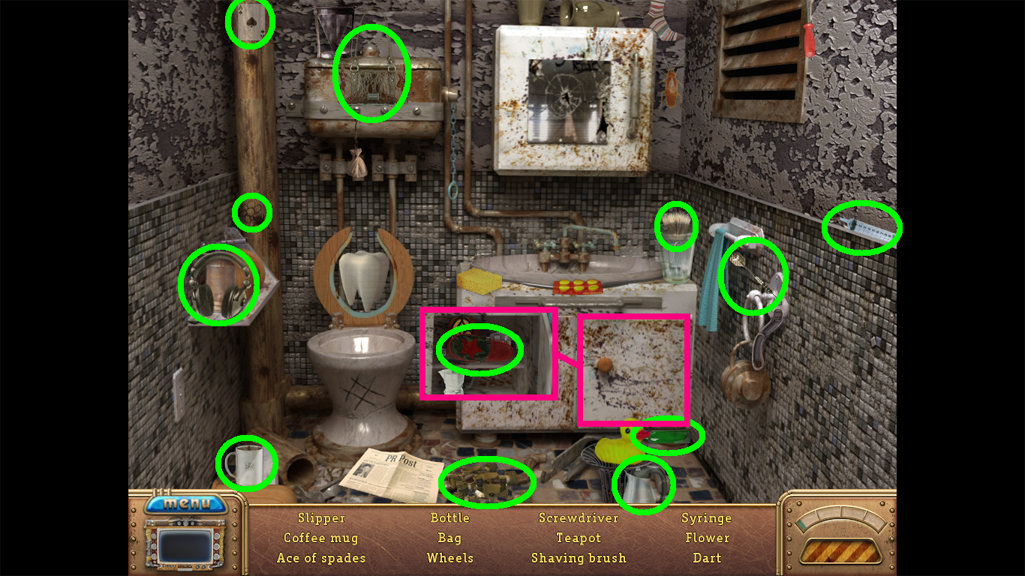
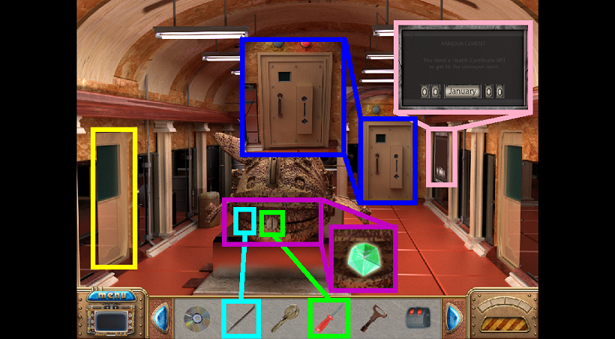
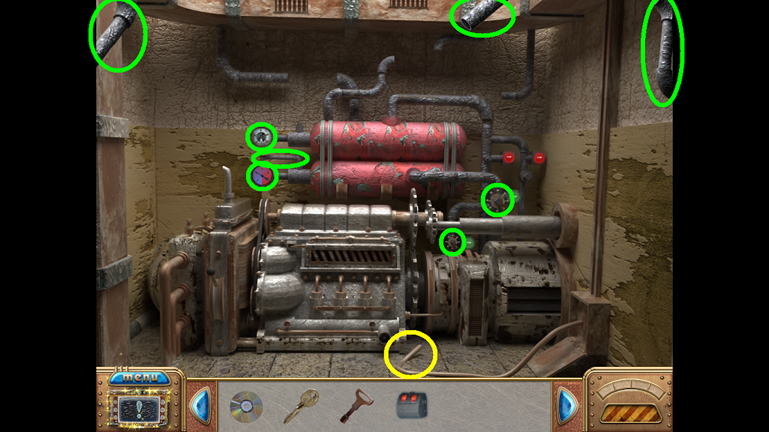
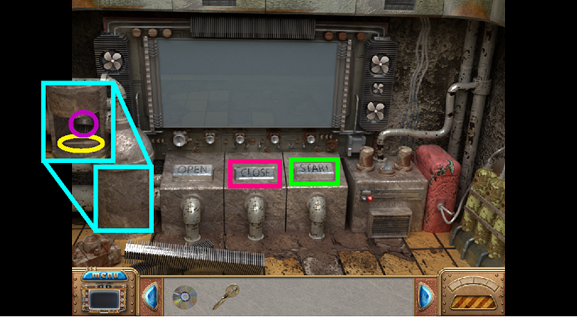
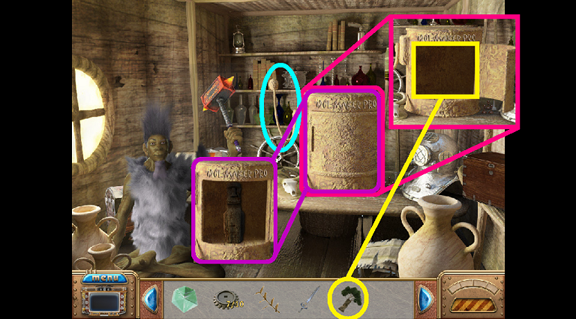
15. In the Basement, observe the following:
• Power Supply box (green)
• The sparkles (aqua)
• The Power Light (yellow) – Note that the Power Light is currently red, indicating there is no power.
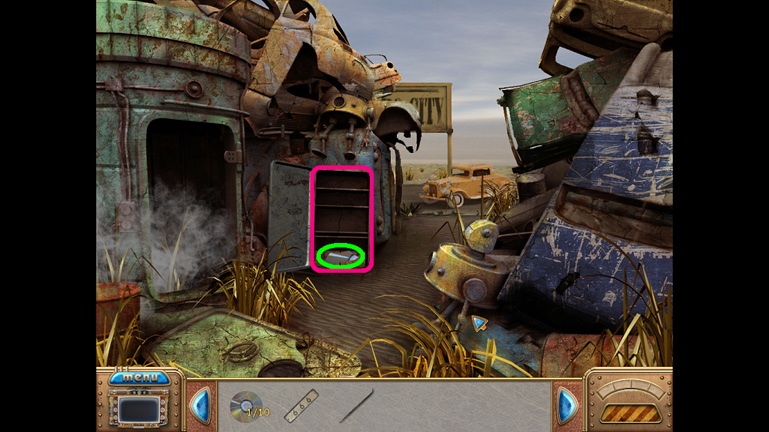
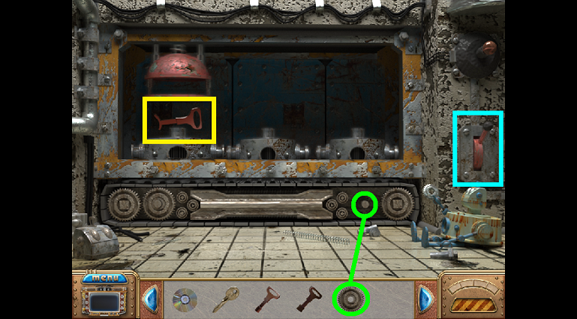
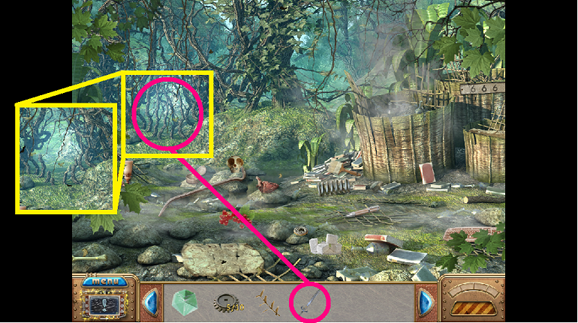
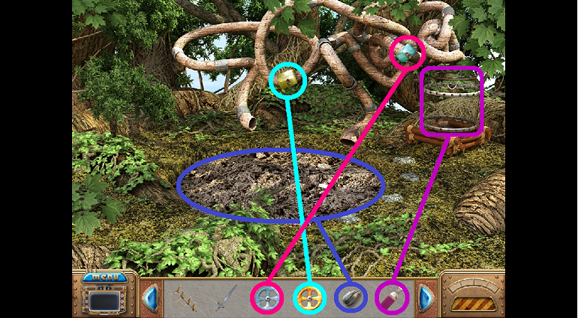
• The Door and Magnetic Card Strip (fuchsia)
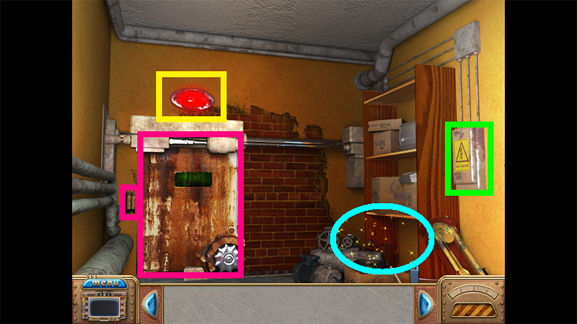
16. Click on the sparkles for a Hidden Object scene. Locate all items listed as shown. You will receive the Crowbar.
17. Go to the Living room (walk down once then click to the right).
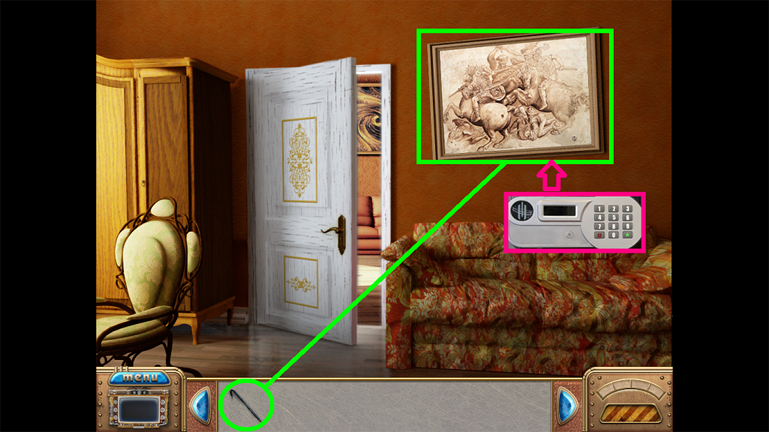
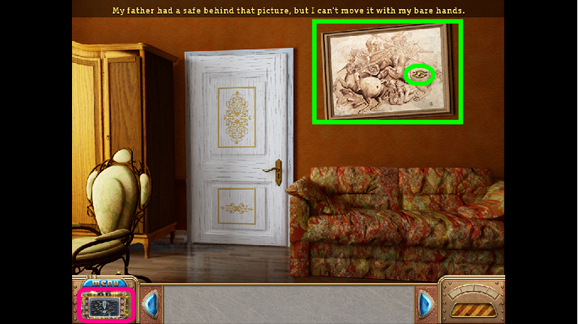
18. Use the Crowbar to move the picture.
19. Behind the picture, find a security panel to a safe (fuchsia). The code in is your Journal, but you cannot yet enter it until there is electricity in the house. Click on your Journal.
20. Return to the Basement (Walk down, then to the left).
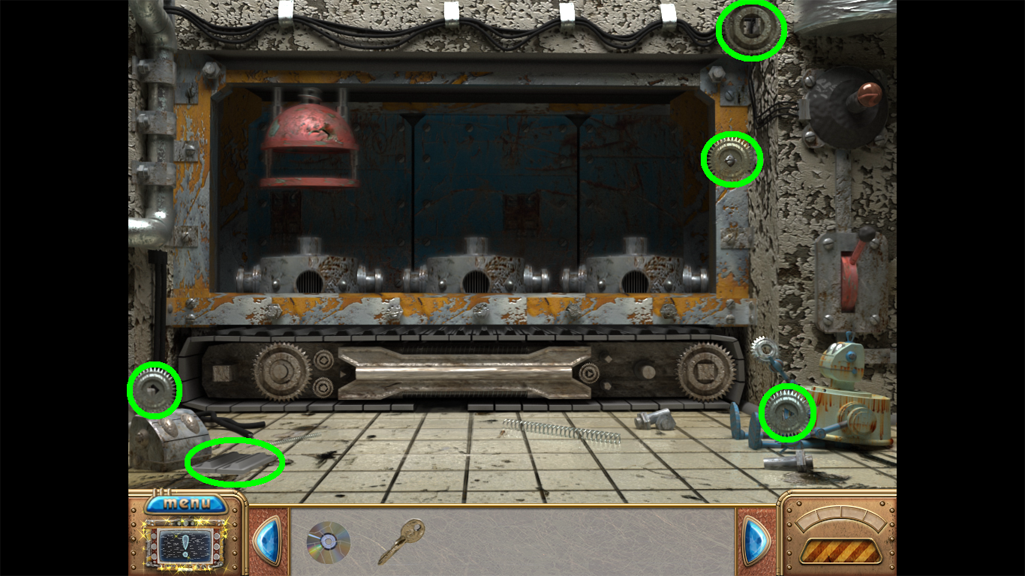
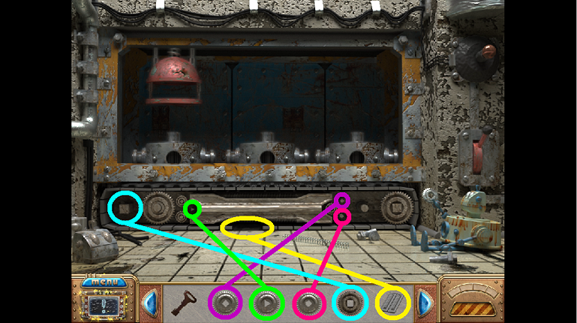
21. Click on the Power Supply Box to see it more closely.
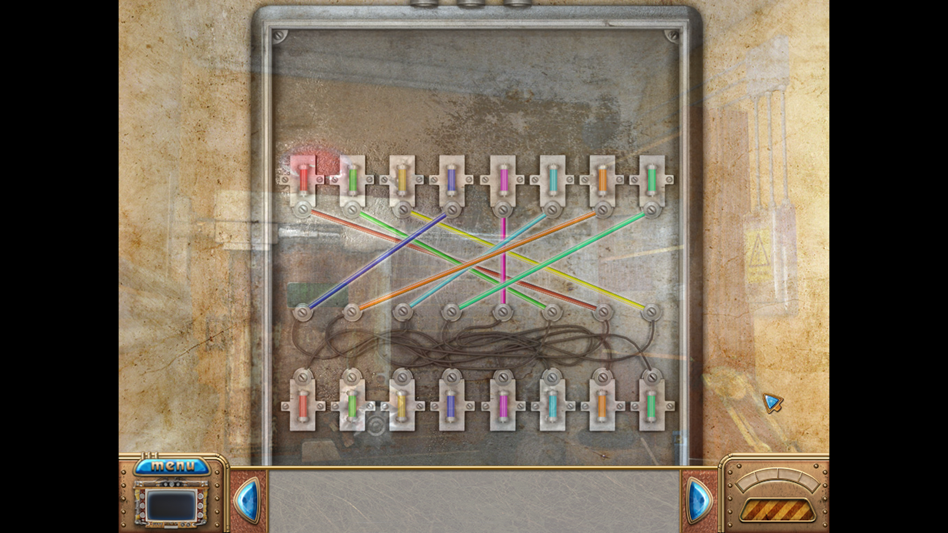
22. Play the mini-game
• Attach the cables to match colors. Working from the bottom, trace the cord from each color up to the bottom set of screws.
• Once you have determined the color attached to each lower screw, click and drag the line from the top screw that matches each color.
• When you have finished, you have electricity in the house!
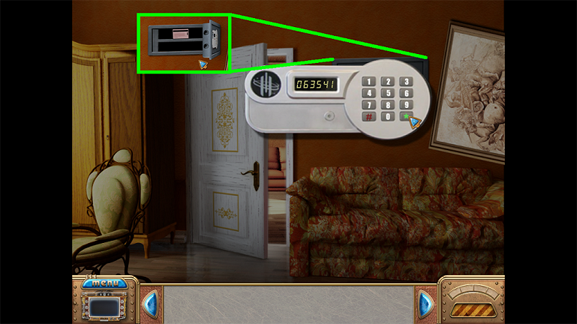
23. Return to the Living Room (Walk down once, then to the right).
24. Click on the security pad and enter the code you found earlier in the Study.
25. Click on the safe after entering the code. Take the card that is in the safe.
26. Return to the Basement (Walk down and to the left).
27. Drag the card from the safe to the magnetic card strip. The door will open and the light will turn green.
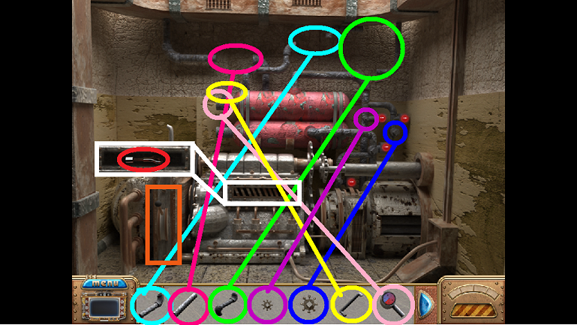
28. Go through the door.
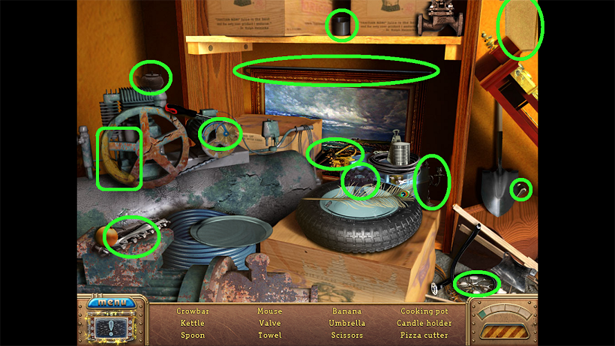
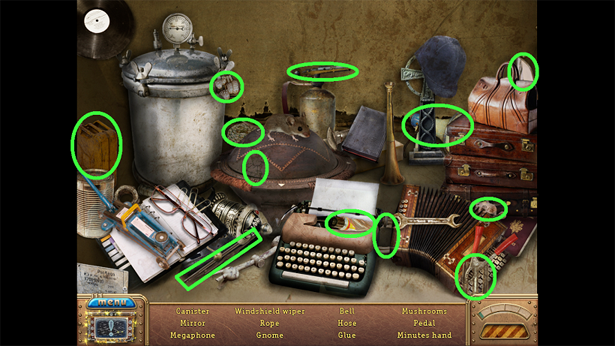
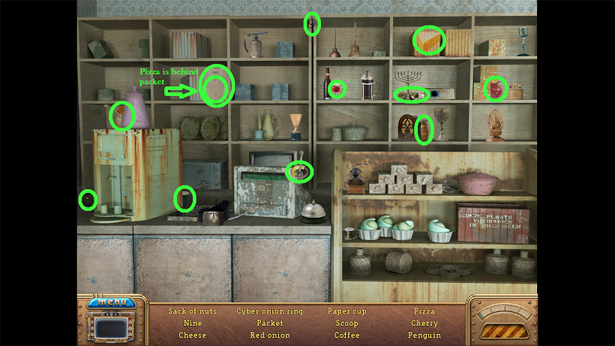
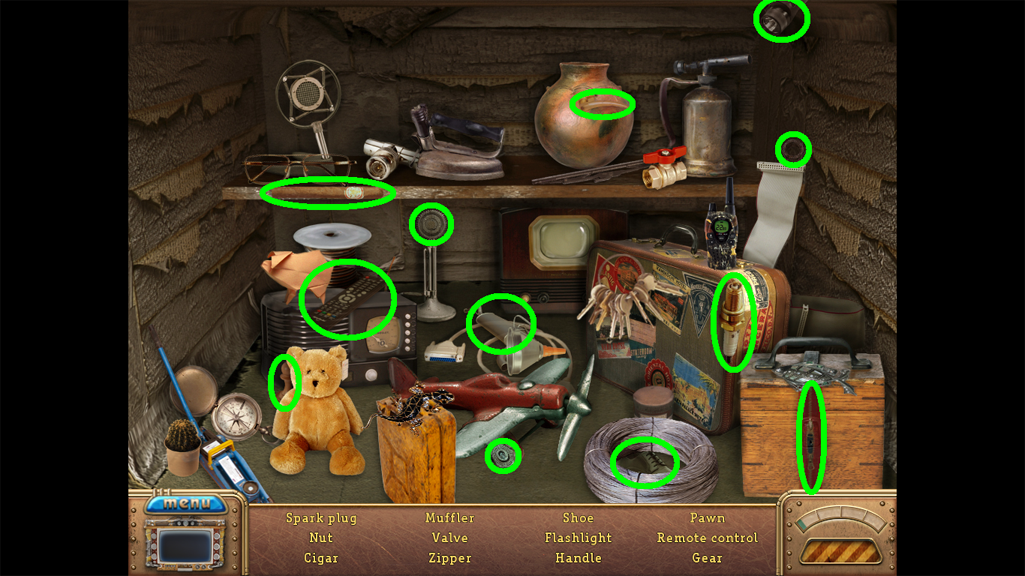
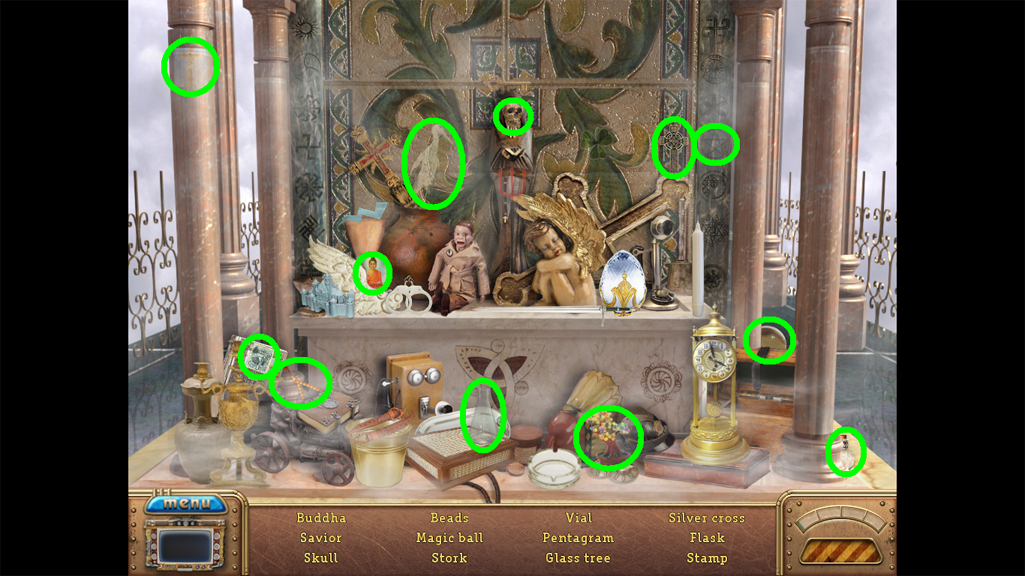
29. You are now in the Laboratory. Find all hidden objects as shown.
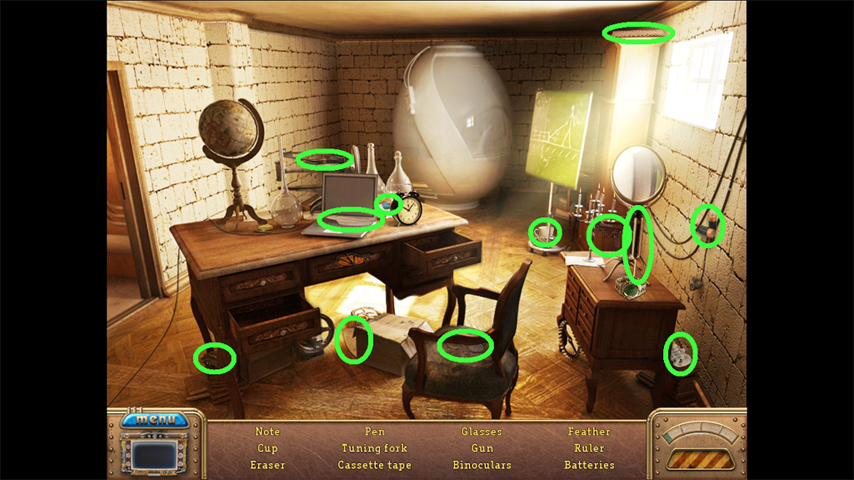
30. You will get a note from your father. Read the note.
31. Note the sparkles emanating from the Teleporter in the back of the Lab. Click to go into it. You need an item to enter the Teleporter.
32. Go back to the Basement entrance (Walk right then left).
33. Click on the sparkles to find hidden objects as shown below. You will add the Fuse to your Inventory.

34. Return to the bedroom (Walk down, then towards the stairs).
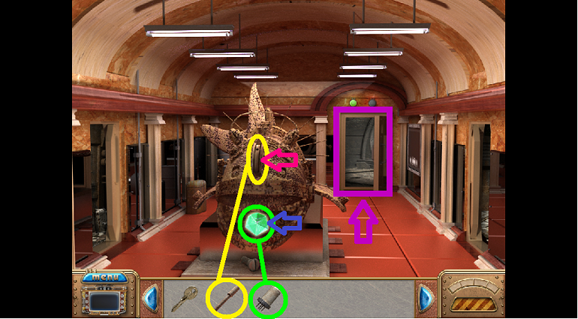
35. Click on the sparkles to find the hidden objects. The Fuse will be added to your Inventory.
36. Return to the Teleporter Room (walk through the door, to the left, through the door, and click on the Teleporter).
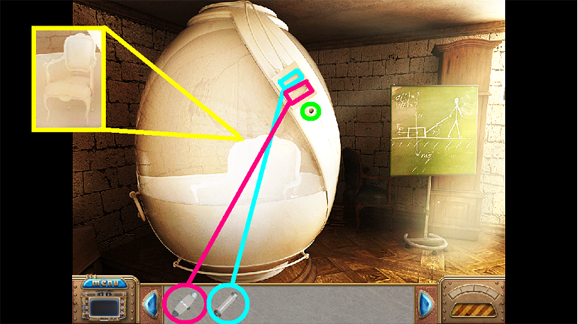
37. Place the Fuses into the matching slots (aqua and fuchsia).
38. Press the button (green). The Teleporter will open and show you a chair.
39. Enter the teleporter.
WORLD 2: ROBO-CITY
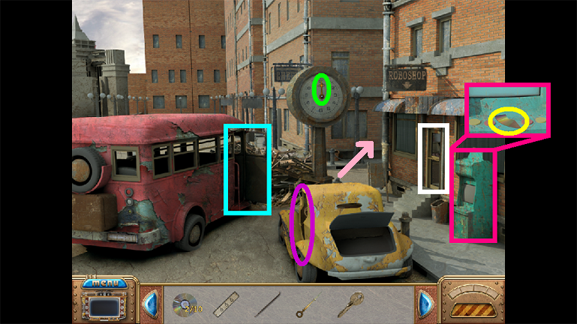
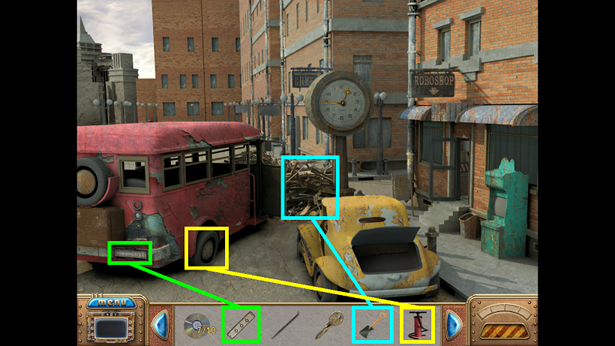
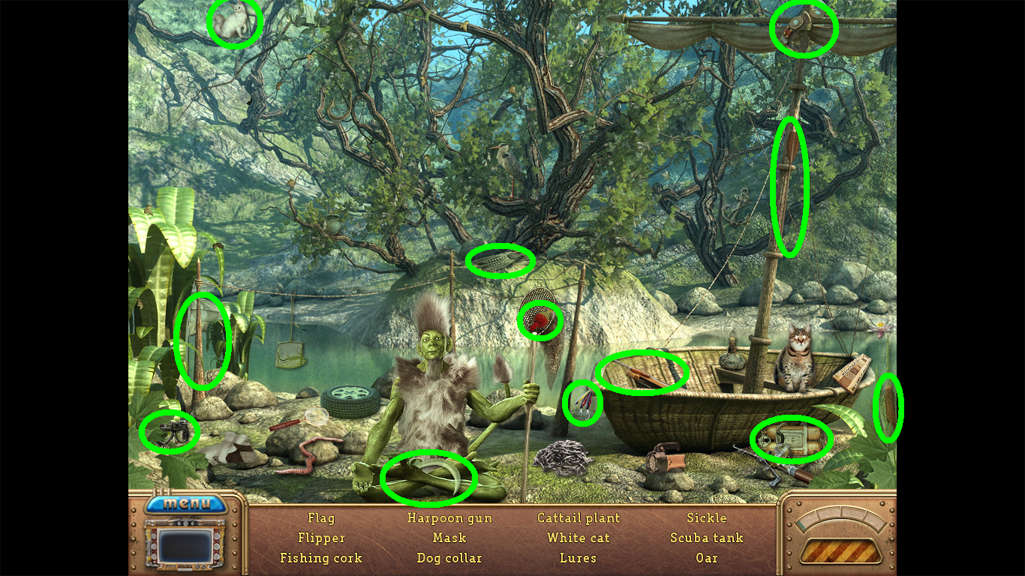
1. Walk forward towards the car. Arrive at Robo City.
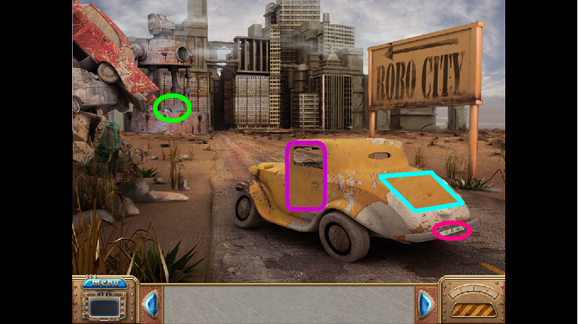
2. Pick up the piece of CD (green). You will be picking these up throughout Robo-City.
3. Take the license plate (fuchsia).
4. Try to get in the trunk (aqua). You need a key.
5. Try to get in the door (purple). You need something to pry it open. Click on the Journal.
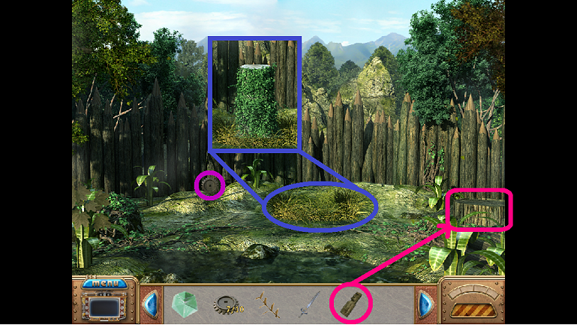
6. Go back to the Teleporter (walk left).
7. Click on the sparkles for the hidden object scene. You will take the crowbar.
8. Click on the door in the center of the scene (pink). Take the CD piece (green).
9. Walk back towards the car.
10. Use the crowbar on the car door. Enter the car.
11. Take the key from the driver’s side sun visor and exit the car.
12. Click on the key hole on the trunk. When enlarged, drag the key to the hole and click to open the trunk.
13. Click on the red sparkles that appear inside the open trunk to go to the Hidden Objects scene. The Minute Hand arrow will go into your Inventory.
14. Enter the car.
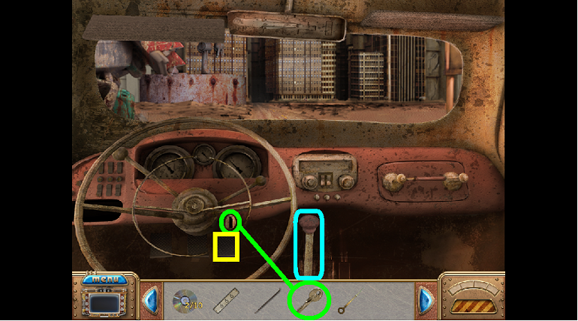
15. Drag the key to the key hole and hold until the engine turns on (green).
16. Click the gear shift knob (aqua).
17. Click on the gas pedal (yellow).
18. When the car stops, get out.
19. Note the alley (pink).
20. Take the Hour Hand arrow (green).
21. Click on the machine; when enlarged, take the CD piece (fuchsia).
22. Enter the bus (aqua). Click to talk to the robot driver.
23. Exit the bus and enter the Robo-Shop (white).
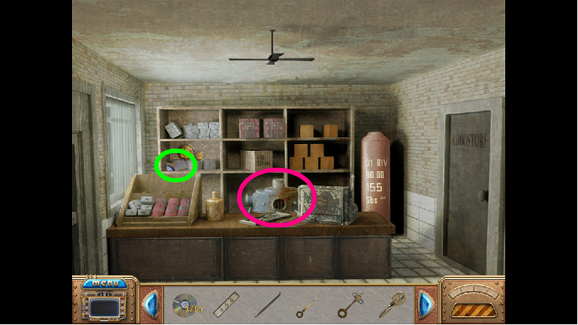
24. Take the piece of broken CD (green).
25. Click on the headless Robot (fuchsia).
26. Exit the Shop and walk towards the Alley.
27. Pick up the broken CD piece (green).
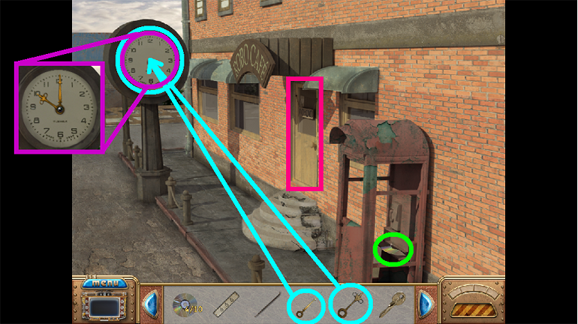
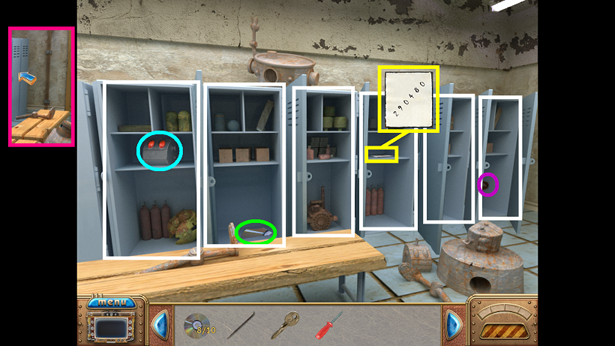
28. Click on the door (fuchsia). The sign will enlarge. After it enlarges, click on the Journal.
29. Drag the two Arrows (Hour Hand and Minute Hand) to the clock’s face (aqua).
30. Keep clicking the Hour Hand until it hits 10:00am (purple).
31. Walk forward.
32. Take the broken CD piece (green).
33. Click on the headless Robot (fuchsia).
34. Note the metal door (yellow).
35. Return to the car (walk down twice).
36. Drive the car back using the same method as before.
37. Exit the car and return the Teleporter area on the left.
38. Click on the sparkles for a Hidden Object Scene. The five Robo-Heads will go into your Inventory.
39. Return to the car and drive back to the city.
40. Enter the Robo Shop. Attach the correct Robo-Head to the robot, then talk to him (green).

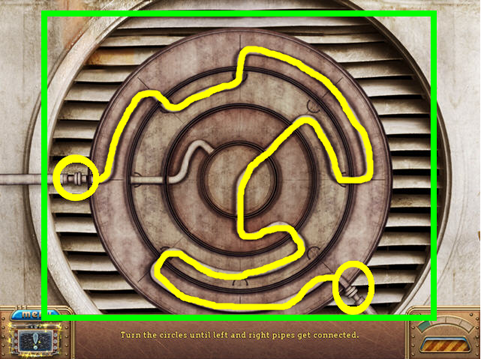
41. Return to the area with the metal door by walking down the alley.
42. Attach the correct Robo-Head to the headless robot (yellow).
43. Try to talk to the robot.
44. Walk through the metal door.
45. Attach the correct Robo-Heads to the correct robots (aqua, fuchsia, purple).
46. Try to talk to the robots.
47. Return to the car (walk down three times).
48. Click on the sparkles to play the Hidden Object scene. The coin will be placed in your Inventory.
49. Enter the Robo-Shop.
50. Give the coin to the Robot.
51. Take the oil can that appears on the counter and leave the shop.
52. Walk to the area with the metal door.
53. Apply oil to the headless robot, then speak with him.
54. Walk through the metal doors and apply oil to each of the robots.
55. Talk to the mother robot.
56. Leave to return to the Robo Café (walk down twice).
57. Enter the Café and click on the sparkles for a Hidden Objects scene. The Nut Candies will be added to your Inventory.
58. Return to the Shed area.
59. Give the Nut Candies to the Mom Robot.
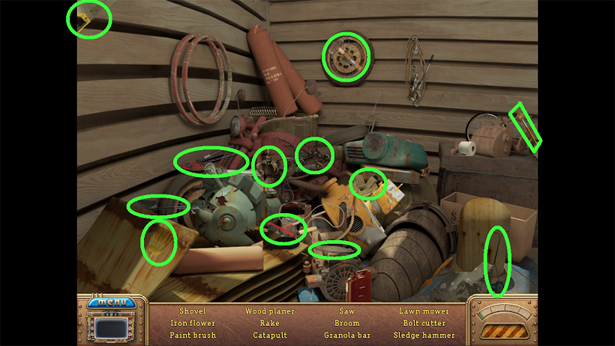
60. Click on the Shed door to open a Hidden Objects scene. You will receive the Shovel for your Inventory.
61. Pick up the shovel and click it on the area with a slight spark (green). Repeat two more times until the Jaw is revealed (fuchsia). Pick up the Jaw.

62. Return to the Bus (walk through the doors, then down twice).
63. Enter the bus.
64. Drag the Jaw to the robot.
65. Apply oil to the robot.
66. Talk to the robot then click on the Journal.
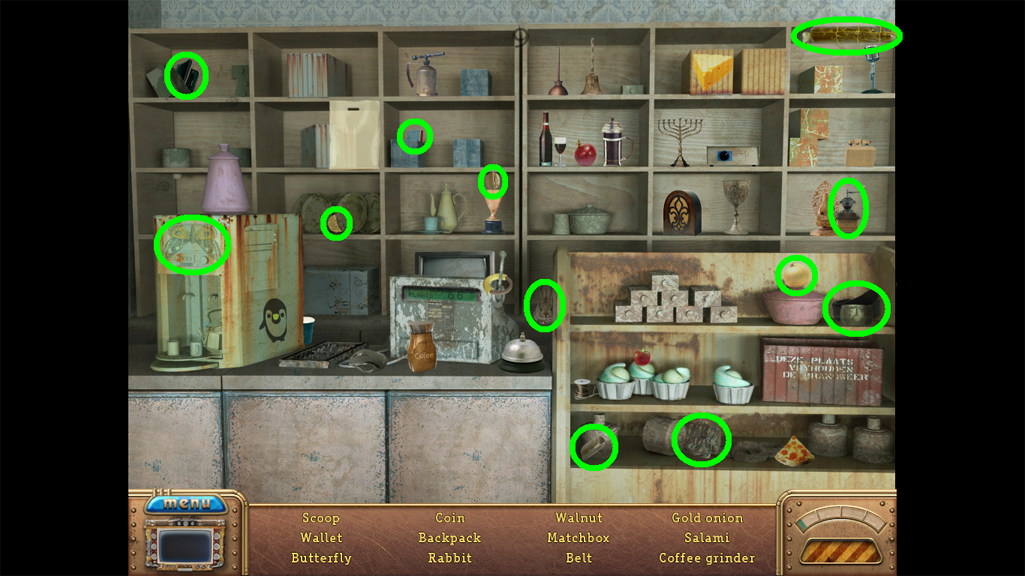
67. Exit the bus and walk back down the alley.
68. Take the Hour and Minute Hands off of the clock.
69. Return to the bus area by walking down once.
70. Place the Hour and Minute Hands on the clock. Adjust the Hands to make it 1:45.
71. Enter the Robo-Shop.
72. Click on the Door on the right side of the Shop.
73. Click on the sparkles that appear to enter a Hidden Objects Scene. You will receive the Pump into your Inventory.
74. Leave the Shop to repair the Bus.
75. Place the license plate on the Bus (green).
76. Use the shovel on the debris (aqua).
77. Drag the pump to the tire (yellow).
78. Click the pump once after it is attached to the tire.
79. Enter the bus and click on the gear shift knob.
80. Exit the bus. You are now at a Robo-City Building.
81. Take the piece of broken CD (green).
82. Click on the door (fuchsia) to enter the Building interior.
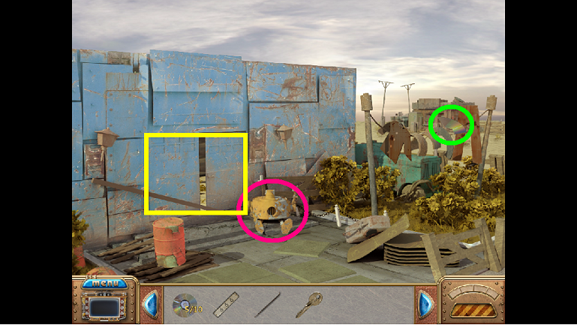
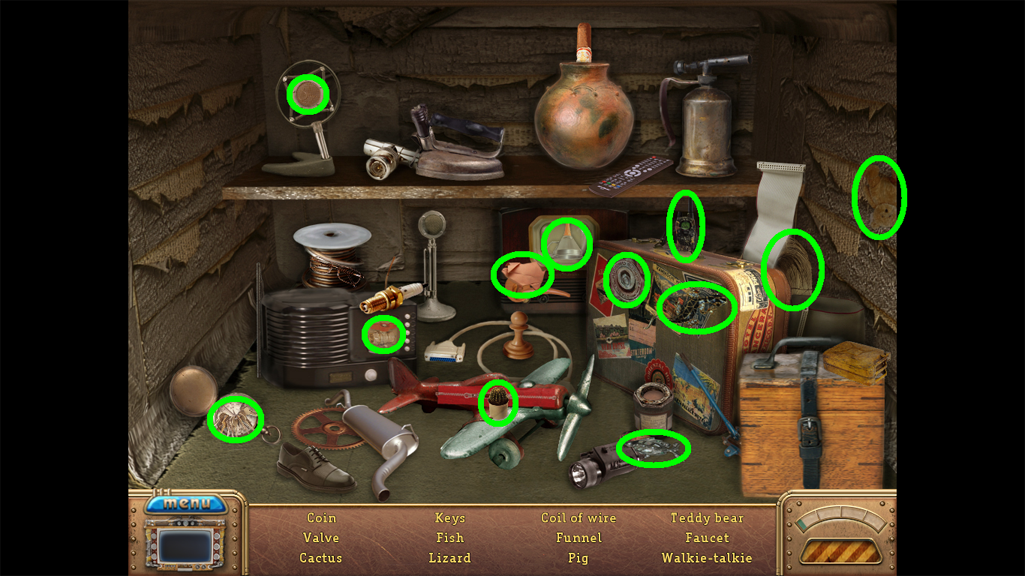
83. Take the broken CD piece (green).
84. Click on the Log book to read the notes (fuchsia).
85. Click on the Keypad (aqua).
86. Click on the door on the left to enter the Locker Room (yellow).
87. In the Locker Room, walk forward to the door (purple).
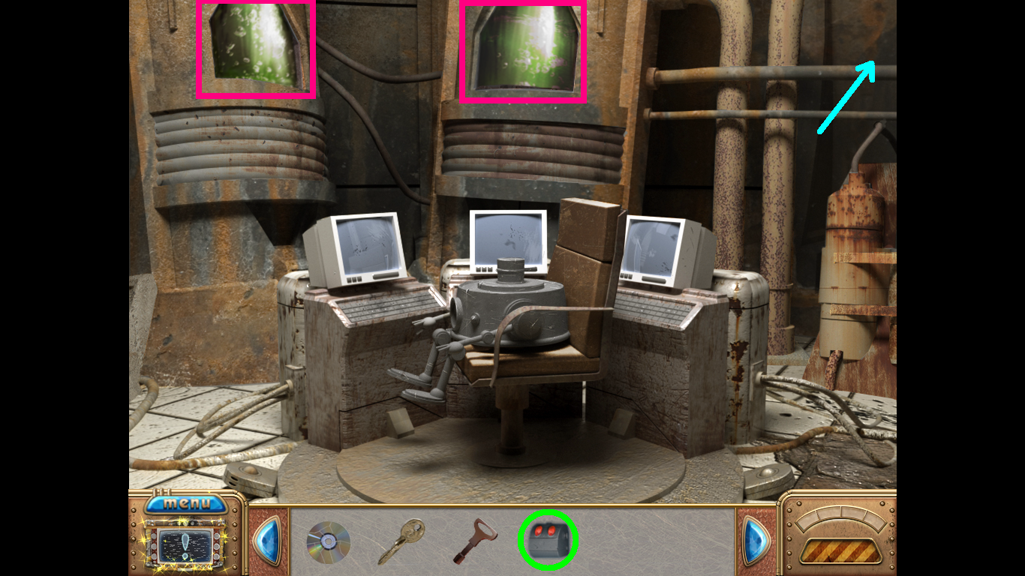
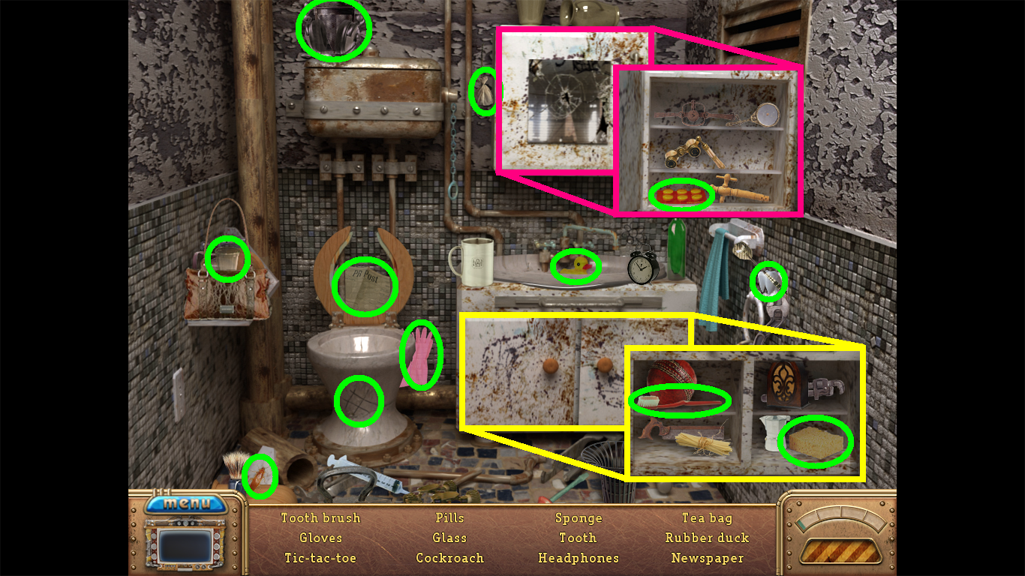
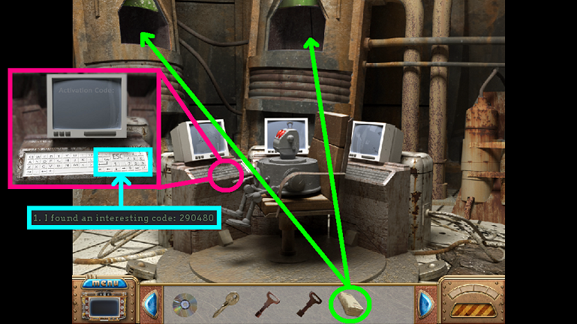
88. You are now in the Bathroom for a Hidden Objects scene. After playing, you will keep the Screwdriver in your Inventory. Note that to get the slipper, you must open the right side door of the cabinet (fuchsia).
89. Walk to the left side of the lockers (fuchsia) and open all of the lockers (white).
90. Take the broken CD piece (green).
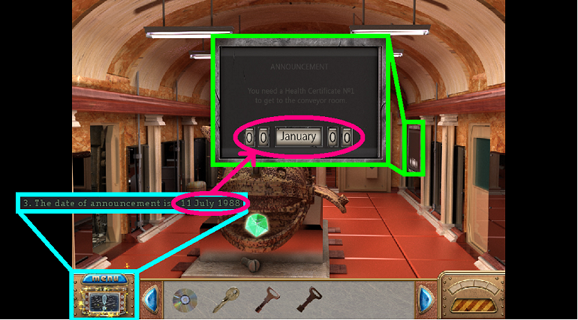
91. Take the Third Key (purple).
92. Take the Robo-Head (aqua).
93. Click on the notebook (yellow). It will enlarge to show a code.
94. Return to the Bus (walk down three times).
95. Drive the bus back to Robo-City by pulling the gear shift knob.
96. Exit the Bus and walk down the Alley to the metal door area.
97. Talk to the sad robot.
98. Go to the Robo-Shop (walk down twice and enter the shop).
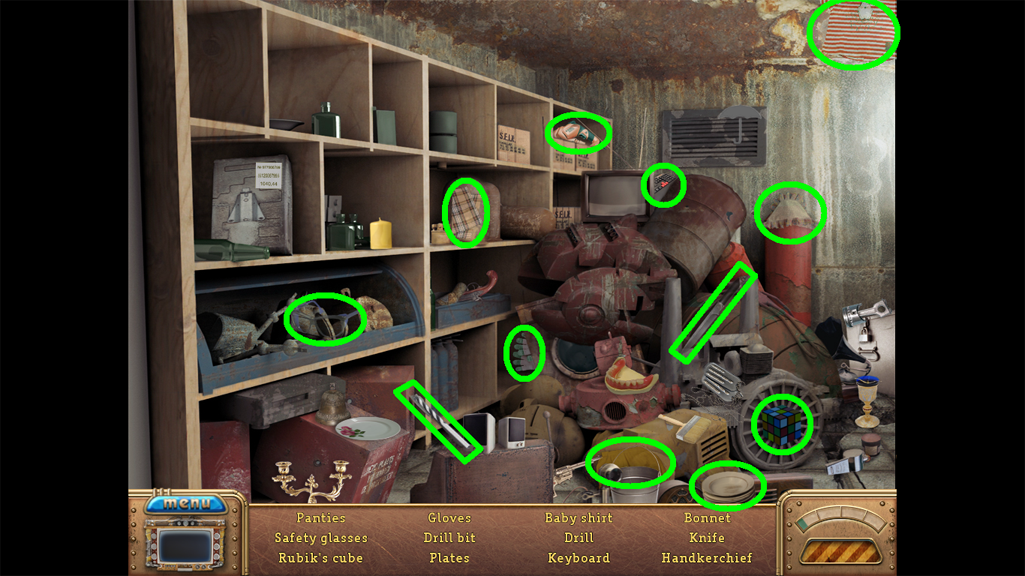
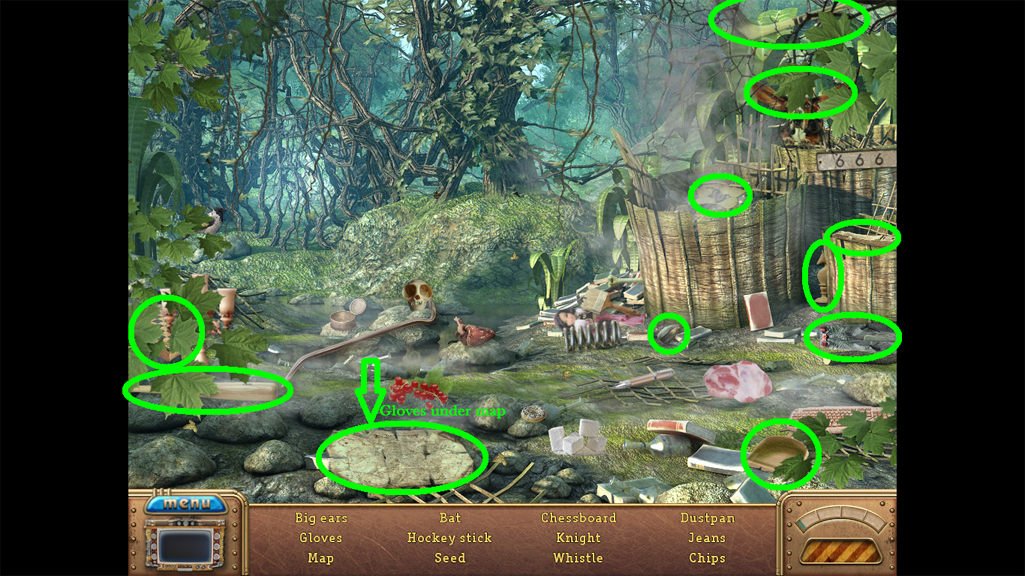
99. Click on the red sparkles coming out of the door on the right to go into a Hidden Objects scene. The Baby Jacket, Panties, Handkerchief, Bonnet, and Gloves will be added to your Inventory.
100. Leave the Robo Shop and return to the Sad robot via the Alley.
101. Drag the Baby Jacket, Panties, Handkerchief, Bonnet, and Gloves to the Sad Robot. Then talk to the robot until red sparkles appear.
102. Play the mini-game (green). The goal is to connect the pipes as shown by rotating the rings (yellow). You will receive Robo-blood.
103. The robot will offer you his Robo-eye and his Robo-arm. Pick them up.
104. Return to the Robo-Shop (walk down twice).
105. Enter the shop and give the Robo-blood to the robot (green).

106. Exit the shop and change the clock to 3:25 (fuchsia).
107. Re-enter the shop and take the Key Card from the counter (yellow).
108. Exit the Robo-Shop and get back in the bus and click on the gear shift knob.
109. Exit the bus and enter the Building through the double doors.
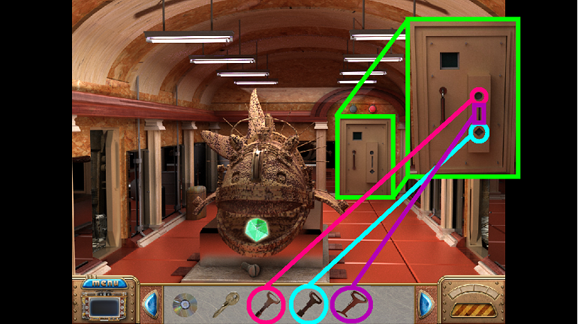
110. Click on the Keypad (green). It will enlarge.
111. Put the Robo-eye in the empty hole on top of the Keypad entry area (aqua).
112. Put the Robo-hand in the large empty box (yellow).
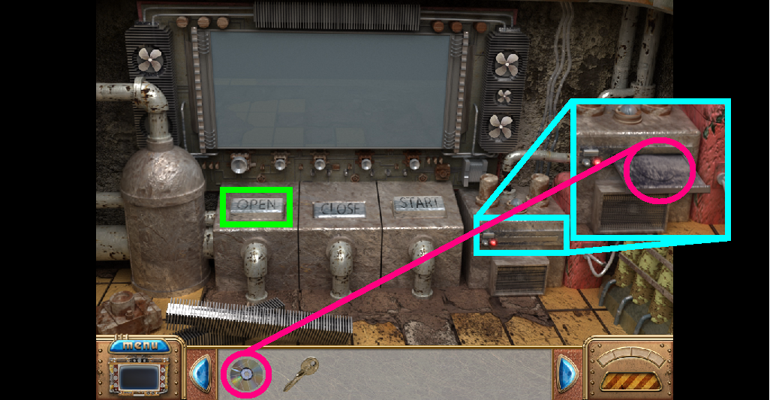
113. Put the Keycard in the Keypad (fuchsia).
114. Open the door next to the Keypad and walk through it to enter a new room.
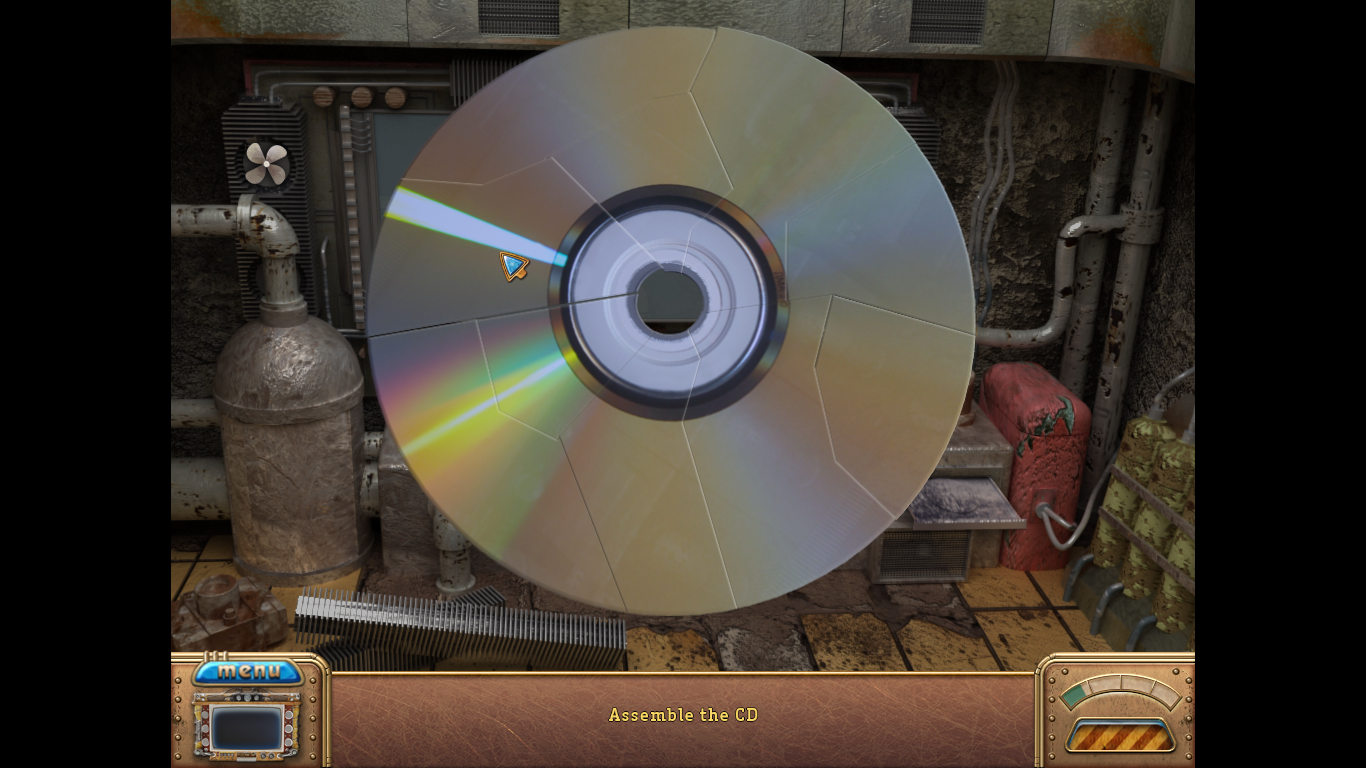
115. Apply the Screwdriver to the Screw in the Fish’s mouth (green).
116. Apply the Crowbar to the Fish’s mouth (aqua).
117. The mouth will open to reveal a gem. Attempt to take the gem.
118. Click on the door at the back of the room. It will enlarge (blue).
119. Click on the Board. It will enlarge to show an announcement (pink).
120. Open and walk through the door on the left (yellow).
121. Try to put the head on the robot (green).
122. Click on the two Container windows (fuchsia). They will open.
123. Walk towards the back right (aqua).
124. To fix the generator, you must first gather the pieces (green). When you click on the cord at the bottom (yellow), it will plug in.
125. Now put each piece you collected back in the correct spot as shown (green, aqua, fuchsia, pink, purple, blue, and yellow).
126. Pull the handle (orange).
127. The compartment with the grate will open to reveal a key (white). Pick up the key (red).
128. Return to the Bathroom (walk down three times, to the left once, then click on the door and walk through it) for the Hidden Objects scene. You will receive Gloves. Note that you must open the bottom cabinet to locate two items (yellow) and the top cabinet to locate one item (fuchsia).
129. Return to the Computer room (walk down, then right, then left).
130. Drag the Gloves to the robot, then put his Robo-head on.
131. Return to the bus (walk down three times).
132. Click on the sparkles for a Hidden Objects scene. Play scene and receive a Coin.
133. Enter the bus and drive back to Robo-City.
134. Exit the bus and enter the Robo-Shop.
135. Give the robot the Coin and pick up the Oil Can that appears just as earlier in the game.
136. Exit the Shop, return to the Bus, and drive back to the Building.
137. Exit the Bus and enter the Building.
138. Return to the Computer Room (walk right, then left).
139. Drag oil can to the robot. Talk to the robot.
140. Leave and return to the Bus (walk back three times, then through the Bus door.
141. Drive to Robo-City and exit the Bus.
142. Walk towards the Alley, going forward twice.
143. Walk through the metal doors.
144. Click on the red sparkles at the Shed to play the Hidden Objects scene. You will receive Coal.
145. Return to the Bus (walk through the metal doors, then down 2 times and click on Bus door).
146. Drive the Bus back to the Building and exit the Bus.
147. Walk into the Building and go back to the Computer Room (walk right, then left).
148. Apply coal to both shafts (green).
149. Click on the computer keyboard, which will enlarge (fuchsia).
150. Enter the code that can be found in your Journal, then press Enter (aqua).
151. Leave the Computer Room (walk down once).
152. Click on the Announcement Board (green).
153. The Announcement Board will enlarge. Take the announcement date from your Journal (aqua) and change the date on the Announcement Board to match (fuchsia).
154. Walk down twice and enter the Bus.
155. Drive back to Robo-City. Leave the bus.
156. Walk down the Alley and enter the Robo-Café for a Hidden Object scene. Locate the items and you will receive a Coin.
157. Return to the Bus area (walk down twice).
158. Adjust the Hour and Minute Hands to make it 8:15 and enter the Robo-Shop.
159. Give the coin to the robot and talk to him.
160. Leave the Shop, get in the Bus, and drive back to the Building.
161. Go inside the Building, then to the right.
162. Go inside the Conveyor Belt Room (green).
163. Locate the miscellaneous pieces around the Conveyor Belt Room.
164. Replace the parts in the correct place as shown.
165. Leave the Building
166. Click on the red sparkles at the back of the Bus to play a Hidden Objects scene; play and you will receive a Gear for your Inventory.
167. Return to the Conveyor Belt Room (enter the building, go right twice).
168. Fix the Conveyor Belt. Start by putting the Gear on the correct place (green).
169. Flip the switch (aqua).
170. The Conveyer Belt will start and will reveal a key; take the Key (yellow).
171. Leave the room and click on the door in the back (green).
172. Apply each key to the correct slot (fuchsia, aqua, purple).
173. Open the door and walk forward into the Conveyor Room.
174. Press the ‘Open’ button (green) and the CD drive will open (aqua).
175. Put the CD in the drive (fuchsia).
176. The mini-game requires you to put the CD together like a puzzle (as shown).
177. Click the ‘Close’ button (fuchsia).
178. Click the Start button (green).
179. The compartment on the left will open (aqua). Take the Switch Lever and Transistor for your Inventory (yellow and purple).
180. Leave the room by walking down once.
181. Use the Switch Lever on the Switch to open the fish’s mouth further (yellow).
182. Click on the Switch to turn the power off (fuchsia).
183. Click on the Gem to try to take it (blue).
184. Replace the Gem with the Transistor (green).
185. Walk forward towards the TV room (purple).
186. Click on the TV screen.
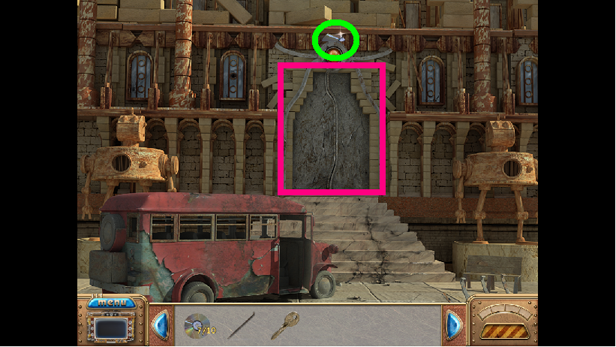
WORLD 3: RIVER WORLD
1. Look at the Teleporter (purple).
2. Pick up the gear (fuchsia).
3. Walk towards the back right (aqua).

4. Note the gear in the tree; click it to see that it is too high (fuchsia).
5. Note the Hut (purple).
6. Click to climb up the Ladder (aqua).
7. Pick up the gear (purple).
8. Take the plank from the tree and place it on the Bridge (fuchsia).
9. Walk down twice to the Teleporter area.
10. Click on the sparkles for a Hidden Object scene. After locating the objects, the Plank will be added to your Inventory.
11. Return to the bridge (walk forward/right, the up the Ladder).
12. Place the Plank on the Bridge.
13. Walk forward on the Bridge, arriving at the Village.
14. Note the Statue in the middle (yellow).
15. Note the closed Shop (fuchsia).
16. Note that you can walk to scenes on both the left and right side of the Village (red, blue).
17. Enter the Idolmaker’s Hut (purple).
18. Take the gear (fuchsia).
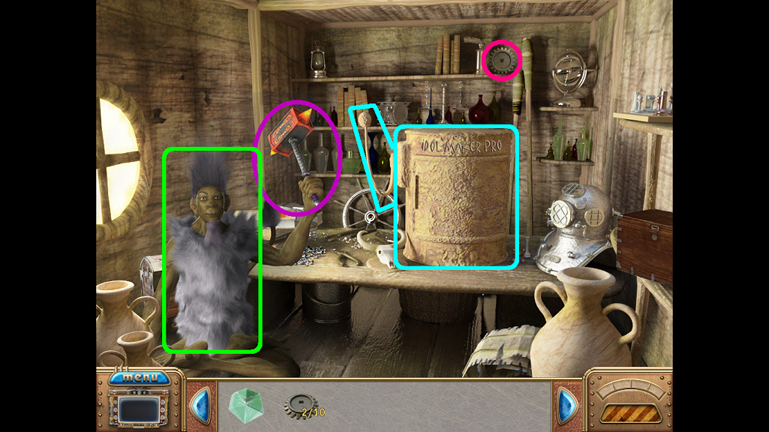
19. Note the Fire Hammer (purple).
20. Note the Idolmaker Pro, including door and handle (aqua).
21. Talk to the Master (green).
22. Leave the Master’s Hut and go visit the Hermit (walk down three times then to the right to the Hut).
23. Speak to the Hermit.
24. Leave and return to the Teleporter area (walk down three times).
25. Click on the sparkles to play a Hidden Objects game. You will receive a Photo.
26. Return to the Hermit’s Hut (walk forward/right twice).
27. Give the Photo to the Hermit.
28. Click on the green sparkles that appear behind the Hermit for a Hidden Object scene. You will receive an Artifact after locating the items.
29. Leave the Hermit’s Hut and return to the Master’s Hut (down, up the ladder, forward twice, then into the Master’s Hut).
30. Talk to the Master, then click on your Journal.
31. Leave the hut and walk left, then forward.
32. Talk to Little Monkey (fuchsia).
33. Take the gear (purple).
34. Take the moss (yellow).
35. Leave and go to the now-open Shop (walk down twice and enter the Shop). There is a Hidden Object scene; the Sword will be placed in your Inventory.
36. Walk left once.
37. Use the Sword on the foliage (fuchsia).
38. The foliage will be cut back revealing a new path. Click to take the path.
39. You will enter a Hidden Objects scene. After finding the items, the Finger will be added to your Inventory.
40. Return to the Village (walk down twice).
41. Walk towards the right.
42. Apply the Sword to the brush on the right side (fuchsia).
43. The brush area will be cleared and reveal a new path (yellow). Take this path.
44. Talk to the Fisherman.
45. When the sparkles appear, click on them for Hidden Objects. You will receive the Fishing Hook in your Inventory.
46. Give the Fishing Hook to the Fisherman; a Fish will appear in his lap.
47. Take the Fish.
48. Walk back down to the Ladder. Click to look at the apples until a gear represents the mouse.
49. Walk up the ladder, then enter the Master’s Hut on the right.
50. Click on the sparkles for a Hidden Object scene. Locate the items and receive a cane for your Inventory.
51. Exit the hut and return to the Ladder area (walk down three times).
52. Take the Cane from your Inventory and click the tree with it. A gear and an apple will fall.
53. Take the gear and the apple.
54. Go to the Hermit’s Hut on the right.
55. Give the Hermit the Moss, Rotten Finger, Apple, and Fish out of your Inventory.
56. Leave the Hermit’s Hut and return to the Master’s Hut (go down once, up the ladder, forward once, into the Hut).
57. Click on the sparkles for a Hidden Object Scene. Play the scene and receive the Alarm Clock.
58. Leave and return to the Hermit’s Hut (walk down three times and to the right towards the hut).
59. Give the Hermit the Alarm Clock.
60. Take the Potion from the Hermit’s lap.
61. Return to Little Monkey (walk down, up the ladder, forward, left, forward).
62. Give the Potion to Little Monkey.
63. Talk to Little Monkey.
64. Return to the Garbage Dump (walk down once, then left).
65. Use the Sword to cut through the brush (fuchsia).
66. Cutting with the Sword will reveal a new cleared path (yellow). Take the new path.
67. Take the two gears (fuchsia).
68. Click on the puzzle on the tree (yellow).
69. Play the mini-game by assembling the puzzle (as shown).
70. Steps will appear in the tree. Click to climb up the steps.
71. Take the Valves (fuchsia); note the ground area in the middle (yellow) and click on the Water Reservoir (aqua).
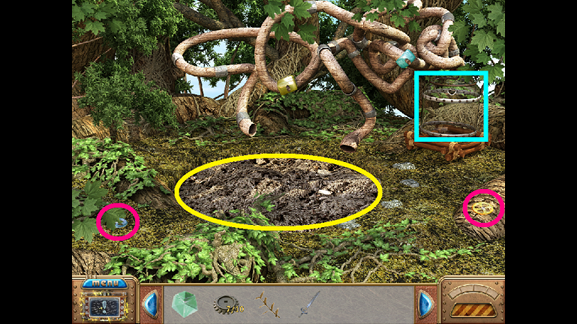
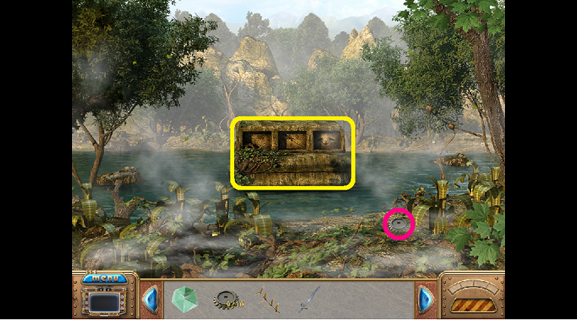
72. Walk down twice to enter a Hidden Object scene. Once played, the Seed will be put in your Inventory.
73. Walk down twice and enter the sparkling Shop for a Hidden Object scene. Locate the items and receive the Vial of Life Water.
74. Return to the Water Area by walking left twice, forward twice.
75. Place the Vial of Life Water into the Water Reservoir (purple).
76. Put the Seed in the Ground area (blue).
77. Place the valves in the correct spots (fuchsia and aqua).
78. Click on each valve to turn them on.
79. A tree appears where the Seed was planted. Drag the sword to the tree.
80. The tree is now a Dwarfish Tree; take the tree.
81. Return to the Master’s Hut (walk down 4 times, then enter the Hut).
82. Open the Idolmaker door (fuchsia).
83. Place the Dwarfish Tree in the Idolmaker (yellow).
84. Close the Idolmaker door.
85. Click on the Idolmaker handle (aqua).
86. Open the Idolmaker door and take the Totem inside (purple).
87. Leave the Master’s Hut; walk down 2 times then go left.
88. Take the gear (purple).
89. Place the Totem on the stump (fuchsia).
90. A large Tree Stump will appear out of the grassy area (blue).
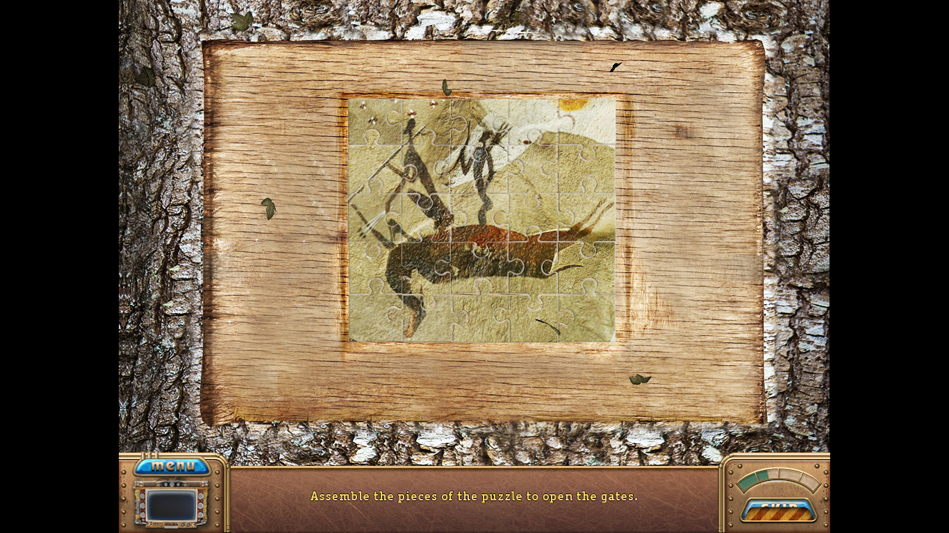
91. Click on the Tree Stump for a mini-game. Solve the game by turning the circles (as shown).
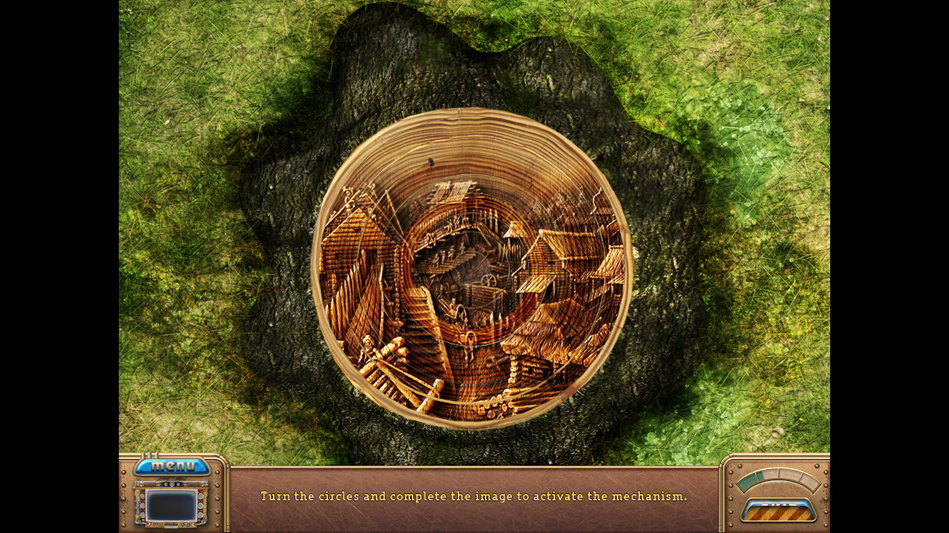
92. When finished, a set of the wood spikes are lowered to reveal a new path.
93. Click to follow the new path to the Mill.
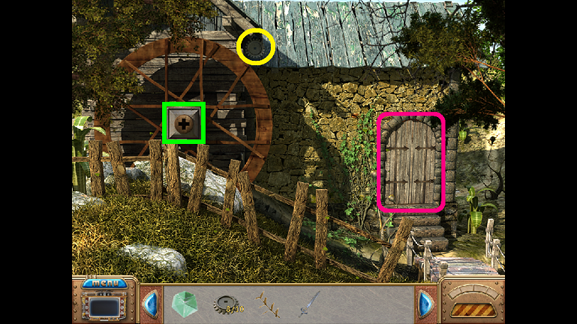
94. Take the gear (yellow).
95. Note the locked door (fuchsia).
96. Note the cross keyhole (green).
97. Walk to the right.
98. Take the gear (fuchsia).
99. Click to speak to the River God (yellow).
100. Click to walk back to the Mill.
101. The Mill Door is now open; walk in.
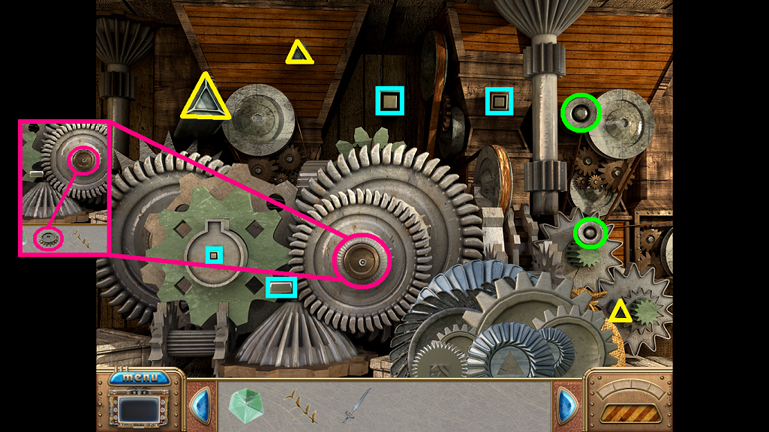
102. Click the Gear from your Inventory anywhere on the Mill gears. Several new gears will appear in the bottom right-hand side of the screen.
103. Match the gears with the correct hubs; use the shape on the hub center to place them correctly (as shown).
104. Return to the Hermit’s Hut (walk down four times, then into the Hut on the right).
105. Click on the green sparkles for a Hidden Object scene. After playing, you will receive the Ram/Sheep Head for your Inventory.
106. Leave the Hermit’s Hut and return to the Fisherman (walk down, up the ladder, walk forward, walk right, and click on the sparkles).
107. You will now enter a Hidden Objects scene. Locate the items and you will obtain the Oar for your Inventory.
108. Return to the River God (walk down three times, then left, the forward, then right).
109. Place the Oar, Sword, and Sheep’s Head in their correct place (fuchsia, aqua, yellow).
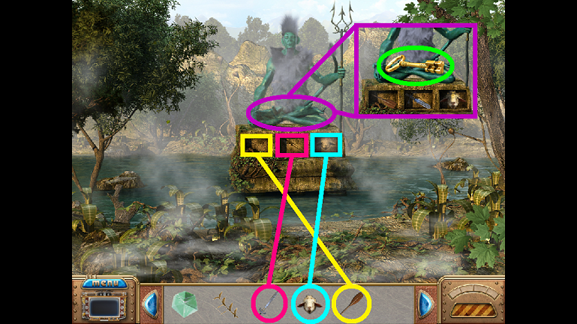
110. A golden Mill Key will appear in the River God’s lap (purple). Take the key (green).
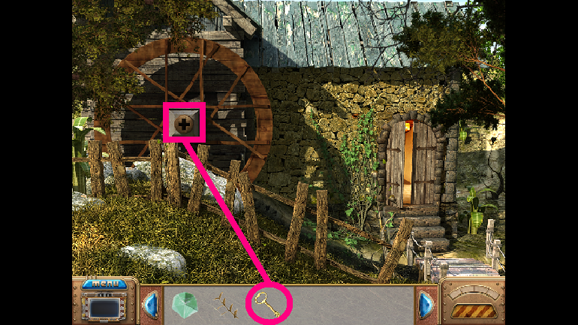
111. Return to the Mill (walk down once).
112. Place the Mill Key in the cross-shaped Keyhole (as shown).
113. Return to the Teleporter (walk down four times and click on the Teleporter).
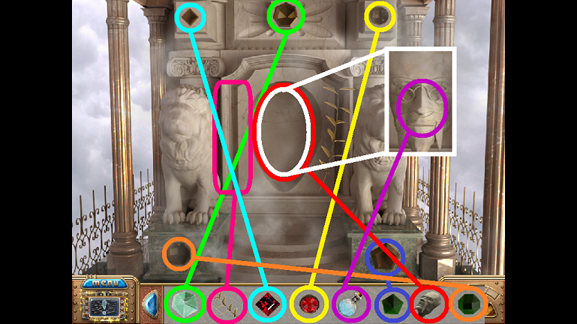
WORLD 4: THE FLYING CITY
1. Walk forward to cross the bridge.
2. Click on the door to enter.
3. The door must be repaired; several pieces come down and must be put together like a puzzle. Place the yellow pieces with the yellow section and the fuchsia pieces with the fuchsia section (as shown).

4. Now the glass must be repaired; the pieces will need to be fit together like a puzzle as well.
5. A horned Guard will appear in the doorway. Talk to him, then click to go forward through the door.
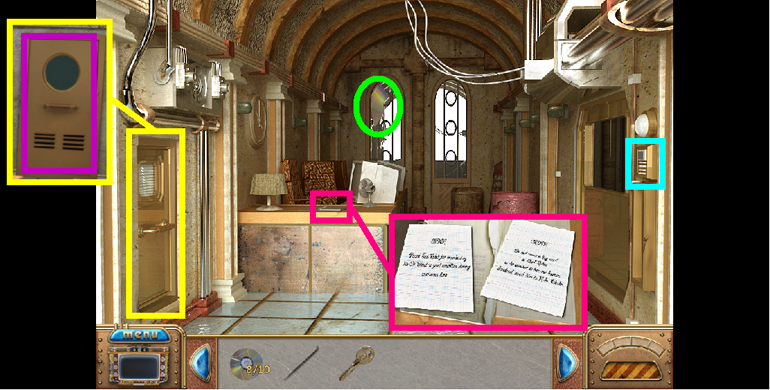
6. You are now in a Plaza. Note the locations of all the doors and the Stairs/Gate. For each door, you will need to click to open the door and click to go in through the door.
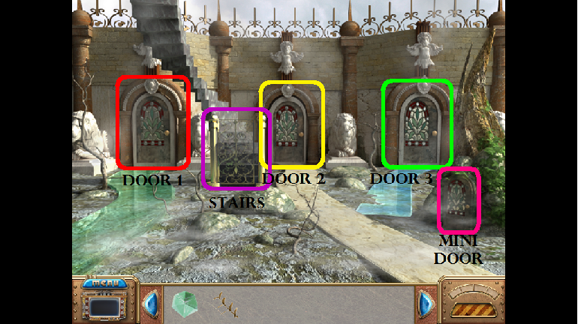
7. Try to enter through the Mini-Door.
8. Try to enter through Door #3.
9. Enter through Door #2.
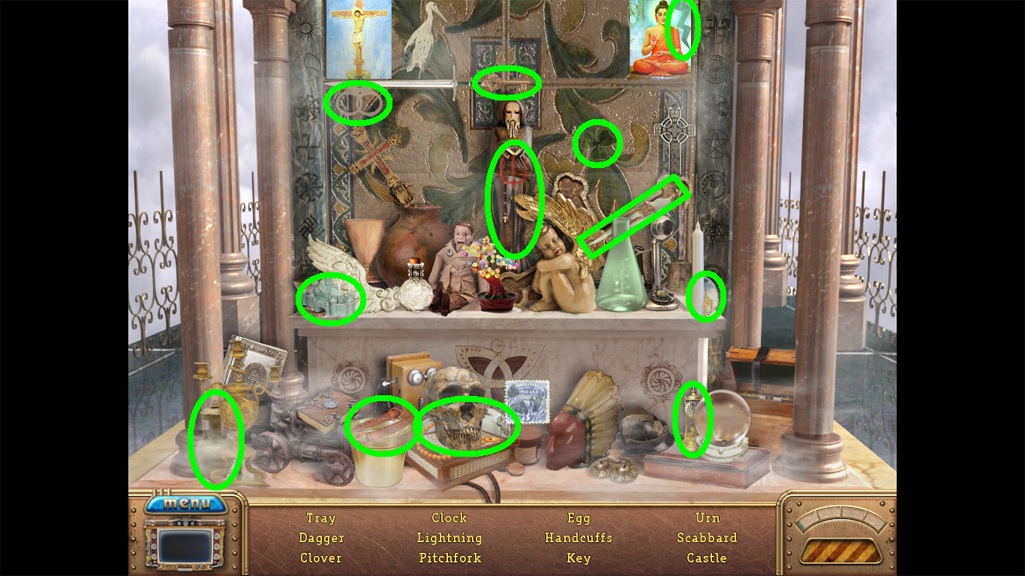
10. Click on the sparkles for a Hidden Object scene. You will retain the Dagger in your Inventory.
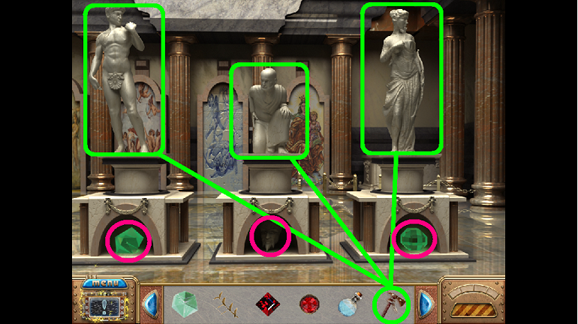
11. Walk forward past either side of the Altar.
12. Take the Emeralds out of the bottom.
13. Return to the Plaza and enter Door #1 (walk down twice, click on the left door).
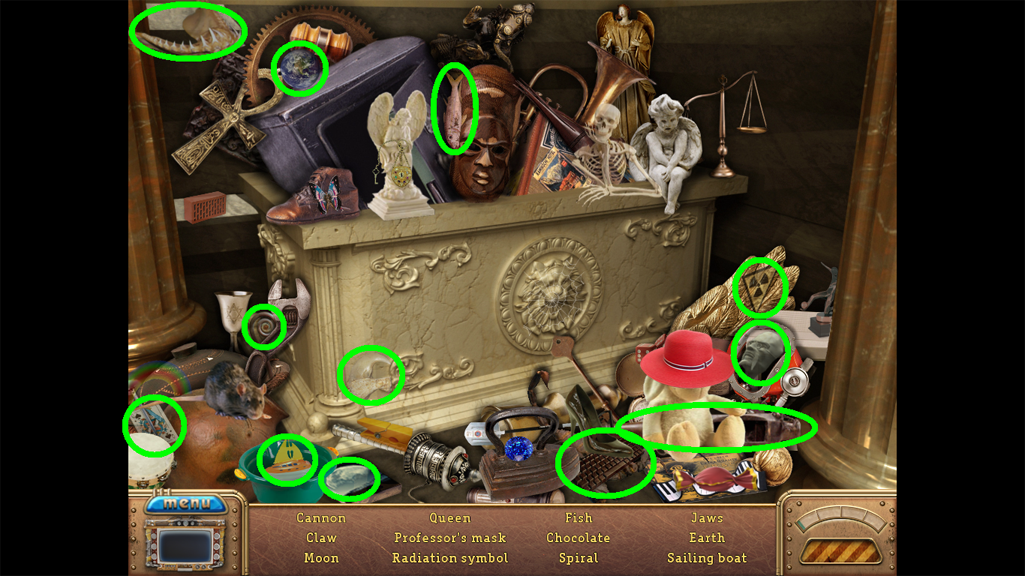
14. Click on the purple sparkles for a Hidden Object scene. After playing, you will receive the Mask.
15. Now speak to the left Statue (fuchsia).

16. Place the 5-sided Emerald in the area under the Statue (green).
17. Take the Key from the Statue (aqua).
18. Leave and enter through the Gate to go up the Stairs.
19. Use the Key on the Sarcophagus on the left (green).
20. The sarcophagus will open to reveal a statue that is bound (fuchsia).
21. Use the Dagger to cut the ropes at the statue’s feet and abdomen (aqua).
22. Talk to the statue.
23. Return to the Plaza, then enter Door #1.
24. Click on the center statue to talk to him (blue).
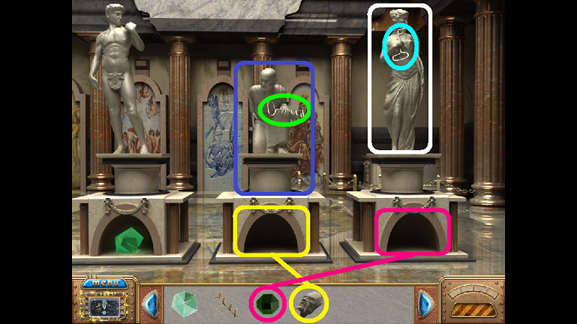
25. Place the Mask in the compartment under the center statue (yellow).
26. Take the center statue’s Key (green).
27. Talk to the right statue (white).
28. Place the Emerald in the compartment under the right statue (fuchsia).
29. Take the right statue’s Key (aqua).
30. Return upstairs (walk down once, click on the stairs).
31. Open the center and right Sarcophaguses using the Keys as shown.
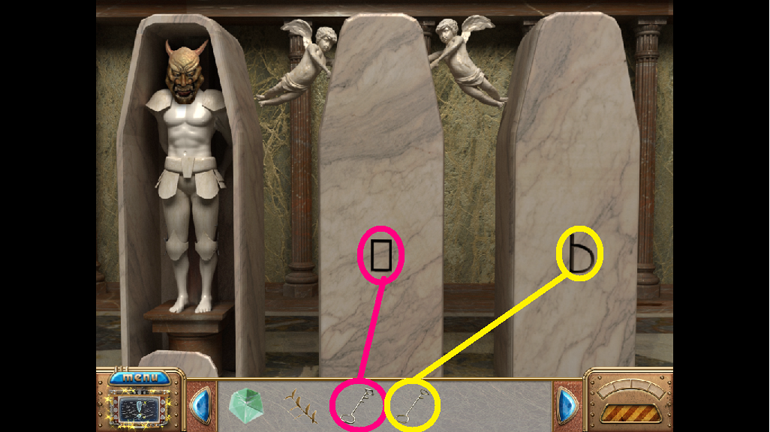
32. Talk to the center and right Statues.
33. Take the mask off of the center and right Statues, then reverse the Masks and place them (the sad Mask now goes on the center Statue and the laughing Mask now goes on the right Statue.
34. Talk to both Statues again.
35. Leave to and enter through the Mini-Door (walk down once, then click on the Mini-Door).
36. Talk to the Gnome (red).
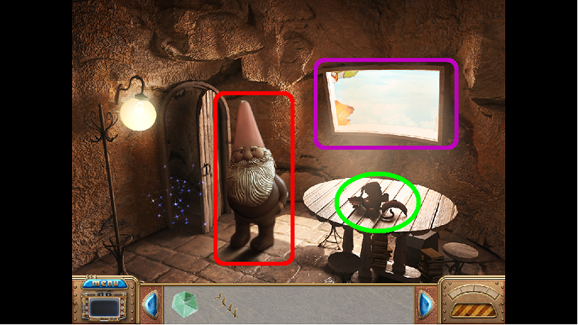
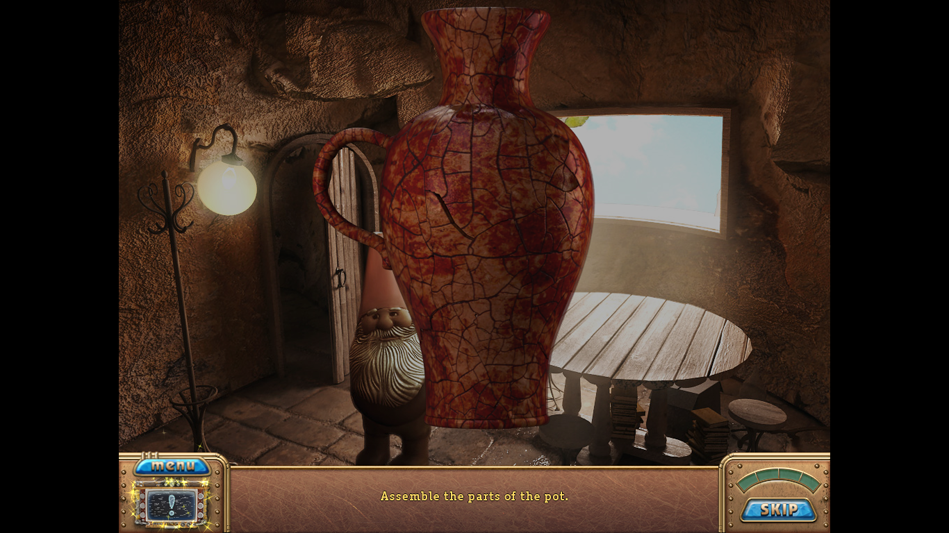
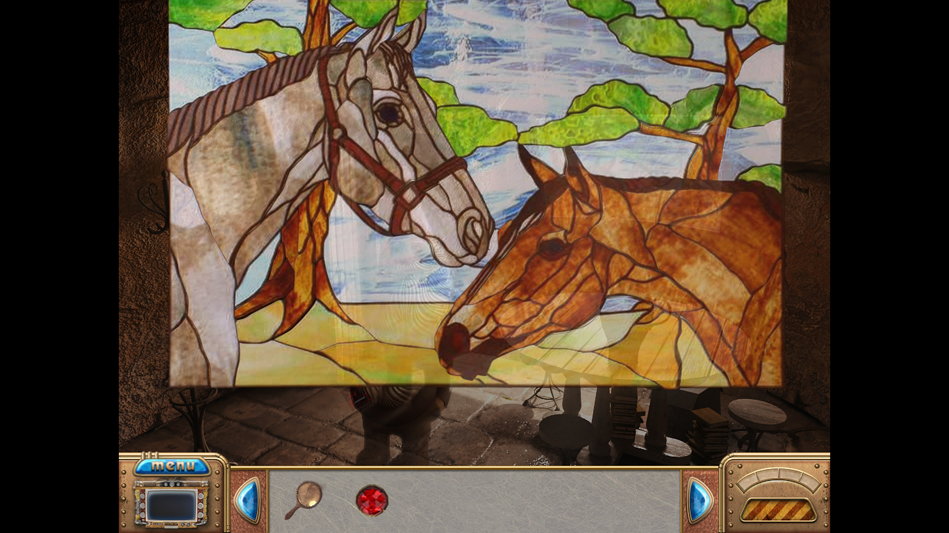
37. Note the Broken Pottery (green) and the Broken Window (purple).
38. Click on the sparkles for a Hidden Objects scene. Locate the items and receive the Mirror for your Inventory.
39. Talk to the Gnome.
40. Click on the Pottery to repair it; the pieces are broken and you must piece them together like a puzzle.
41. Piece together the Window also like a puzzle.
42. After repairing the items, two rubies will appear on the floor (green). Take them.

43. Return upstairs (walk down, then click on the gate).
44. Give the Mirror to the right Statue (green).

45. Talk to the Statue (fuchsia).
46. A Key will appear at the Statue’s feet (yellow). Take the Key (aqua).
47. Return to the Plaza (walk down once).
48. Use the Key to open Door #3, then walk through the door.
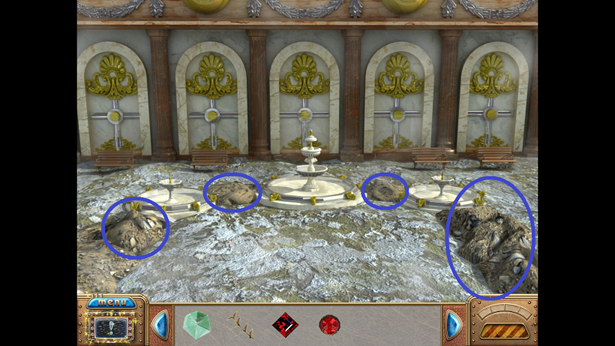
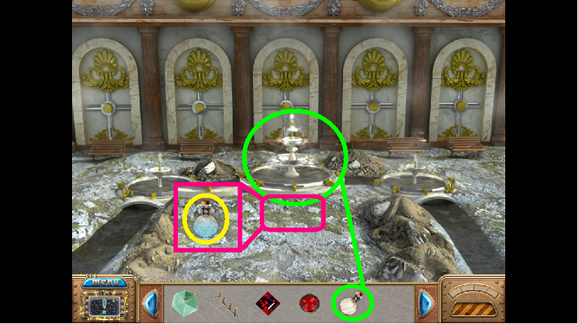
49. You are now at the Fountains. Click on any one of the dirt piles (blue).
50. Return to the Plaza and enter Door #1.
51. Click on the sparkles for a Hidden Object scene. After finding the items, you will keep the Shovel in your Inventory.
52. Return to the Fountains (walk down, then through Door #3).
53. Use the Shovel on each pile of dirt.
54. Go to the Hall (walk down, through Door #2).
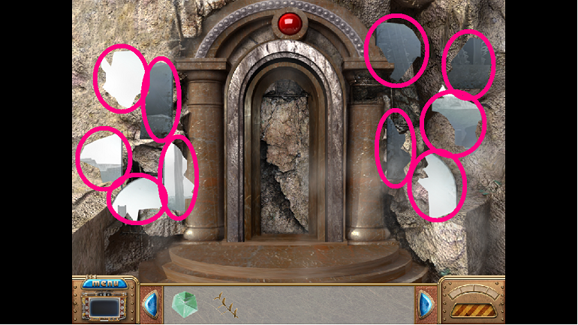
55. Click on the sparkles to go to the Altar for a Hidden Object scene. You will locate the items and keep the Vial for your Inventory.
56. Return to the Fountains and drag the Vial to the center fountain to fill it with Life Water (green). Then take the Vial of Life Water (fuchsia).
57. Return to the Plaza (walk down once) and enter through Door #1.
58. Talk to the center Statue.
59. Return to the Plaza (walk down once) and enter the Mini-Door into the Gnome’s house.
60. Click on the sparkles to reveal a Hidden Object scene. You will keep the Axe.

61. Return to the Plaza (walk down once), then enter through Door #1.
62. Use the Axe on all three statues (green).
63. Take the Emeralds and the Mask from under the Statues (fuchsia).
64. Return to the Hall (walk down once, then walk through Door #2).
65. Walk forward (past the Altar).
66. Place each Gem (the two rubies, two emeralds, and one Life Gem) in its correct location (as shown).
67. Place the artifact in its correct spot (fuchsia).
68. Place the Mask in the center (red).
69. The entire space in the center will be taken up by the Mask (white).
70. Place the Life Water on the Mask (purple).
71. Your Father will appear. Talk to him.
72. The Horned Guard will appear. Talk to him.
Congratulations! You have just completed Cross Worlds: The Flying City!
Content(s) of this game guide may not be copied or
published on any other site without permission from Casual Game Guides.
©CasualGameGuides.com 2006 - 2021